The Journey To CAPI - Part 1: Building A Scalable K8S Cluster At Home
Context
For more than a year, I’ve been running a Kubernetes cluster in my homelab. It worked fine, but since it was fully on-premises, I had to live with the usual DIY trade-offs. Features that cloud providers take for granted - like native external load balancing and CSI integration - weren’t available out of the box.
kubectl get nodes
NAME                                     STATUS   ROLES           AGE    VERSION
k8s-master-node-01.internal.locthp.com   Ready    control-plane   510d   v1.31.1
k8s-master-node-02.internal.locthp.com   Ready    control-plane   510d   v1.31.1
k8s-master-node-03.internal.locthp.com   Ready    control-plane   510d   v1.31.1
k8s-worker-node-01.internal.locthp.com   Ready    <none>          510d   v1.31.1
k8s-worker-node-02.internal.locthp.com   Ready    <none>          510d   v1.31.1
k8s-worker-node-03.internal.locthp.com   Ready    <none>          342d   v1.31.1
To keep things running, I had to stitch together my own solutions:
-
Networking & ingress: HAProxy as an external load balancer (with PROXY protocol v2) and NGINX ingress.
-
Storage: Longhorn for CSI and persistent volumes.
-
Automation & certificates: externalDNS for DNS records, cert-manager for TLS.
-
Observability: Loki for logging, Prometheus + Grafana for monitoring.
This setup worked, but it wasn’t exactly what I’d call “cloud-native”. I started wondering: what if I could build a Kubernetes platform that feels closer to what you’d get in a real cloud environment?
That’s when I turned to Cluster API (CAPI). For me, OpenStack was simply the environment I had available in my homelab - but the real point is that CAPI is cloud-provider agnostic. Whether you’re on AWS, Azure, vSphere, or even bare metal, the model is the same: CAPI treats the infrastructure as a pluggable provider and focuses on managing Kubernetes clusters consistently across them.
My goals with this project were simple:
-
Deploy Kubernetes clusters in a cloud-native way
-
Achieve real scalability, e.g., dynamically scale worker nodes with Cluster Autoscaler (even from zero)
-
Lay the groundwork for multi-tenant workloads in future setups
This post is Part 1 of my journey: deploying a kubeadm-based CAPI cluster on OpenStack, with two node pools and autoscaling from zero.
What is Cluster API (CAPI)?
Cluster API is a Kubernetes sub-project that brings the Kubernetes-style declarative model to managing Kubernetes clusters themselves. Instead of manually provisioning clusters or relying on vendor-specific tools, you define clusters the same way you define Pods or Deployments — using YAML manifests and Kubernetes controllers.
At its core, CAPI revolves around two main concepts:
-
Management Cluster (“mothership”): A Kubernetes cluster where the Cluster API controllers run. This is the control center that provisions, upgrades, and manages other clusters.
-
Workload Clusters: The actual Kubernetes clusters where your applications run. These clusters are created and managed by the management cluster, but the magic comes from the Custom Resource Definitions (CRDs) that Cluster API introduces.
To give a clearer picture, here’s the CAPI architecture Cluster API: A Deep Dive On Declarative Cluster Lifecycle Management

CAPI doesn’t invent a new toolchain - instead, it extends Kubernetes itself with new API objects that describe clusters and their underlying infrastructure. For example:
-
Cluster – the high-level definition of a Kubernetes cluster (control plane + workers).
-
Machine – represents a single node (VM, bare-metal host, cloud instance).
-
MachineDeployment – manages a scalable set of machines (similar to a Deployment for Pods).
-
MachineSet – lower-level replica set of Machines.
-
Infrastructure Providers – CRDs that describe how to provision infra (AWS, Azure, OpenStack, vSphere, BareMetal, etc).
-
Bootstrap Providers – CRDs that handle how nodes get bootstrapped (e.g., via kubeadm).
Each Infrastructure Provider (e.g., AWS, Azure, OpenStack, vSphere, BareMetal, Docker) defines its own CRDs and controllers that extend CAPI’s core objects. These provider-specific APIs describe how to provision and configure infrastructure in that environment. For example:
-
AWS Provider (CAPA) adds AWSCluster, AWSMachine, AWSMachineTemplate.
-
OpenStack Provider (CAPO) adds OpenStackCluster, OpenStackMachine.
-
Docker Provider (CAPD) adds DockerCluster, DockerMachine.
-
vSphere Provider (CAPV) adds VSphereCluster, VSphereMachine.
So the generic Cluster object might reference an AWSCluster or an OpenStackCluster, depending on which provider you’re using.
Cluster API’s separation of core lifecycle logic (CAPI) and provider-specific implementations (CAPx) makes it possible to manage Kubernetes clusters in a consistent way across many environments: public clouds (AWS, Azure, GCP), on-prem/private cloud (OpenStack, vSphere, bare metal), and even edge (IoT devices).
With a single management cluster, we can provision workload clusters in different environments - without tying ourselves to one platform.
This flexibility gives us freedom of placement: the ability to choose where workloads run depending on cost, compliance, or locality, without changing the workflow.
Even more interesting:
-
A workload cluster can itself be bootstrapped into a management cluster (the “grandmothership” idea).
-
This “cluster of clusters” pattern enables nested orchestration:
-
Management cluster → provisions workload clusters
-
Some workload clusters → promoted into management clusters
-
These can then manage Hosted Control Plane (HCP) child clusters
-
In effect, the grandmothership model lets you grow an organically expanding “cluster of clusters”. Each layer can take responsibility for the next, ultimately allowing one seed cluster to fan out into a fleet spanning cloud, on-prem, and edge - all declaratively, with Kubernetes-style APIs.
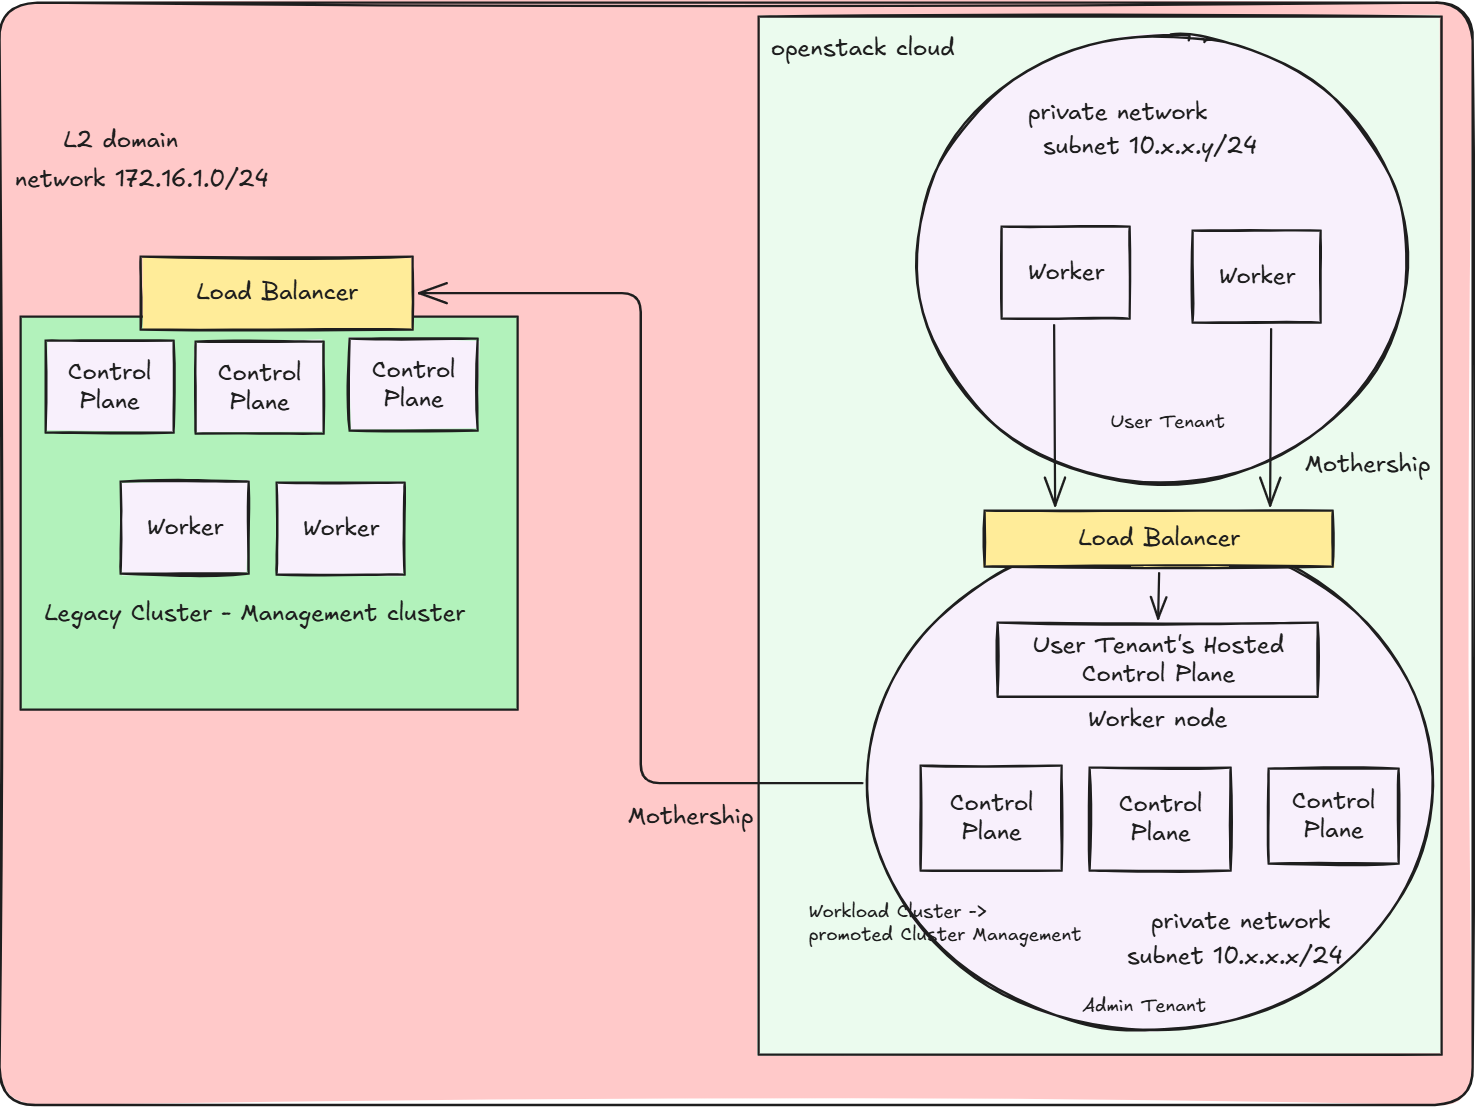
👉 In Part 2, I’ll take this grandmothership idea even further - giving each user tenant their own Hosted Control Plane (HCP) model, so they can run and scale Kubernetes clusters with full isolation
Now that we’ve covered the basics of CAPI and the grandmothership concept, let’s roll up our sleeves and actually build something. In this first part of the journey, I’ll start simple but powerful: deploying a kubeadm-based CAPI cluster on my own cloud. I’ll set up two separate node pools, configure them for autoscaling (from zero nodes!), and prove that this isn’t just theory - it works in a real homelab.
Prerequisites
Infrastructure: OpenStack environment (already set up, you can choose whatever Infrastucture Providers based on your demand)
- Compute Service (Nova)
- Network Service (Neutron)
- Image Service (Glance)
- Storage Service (Cinder)
- LBAAS (Octavia)
Base tools:
clusterctl(CAPI CLI)kubectlk9s
Networking:
- Reachable Neutron network for control plane and worker nodes, Floating IP attached to LB-based kube-api server if required
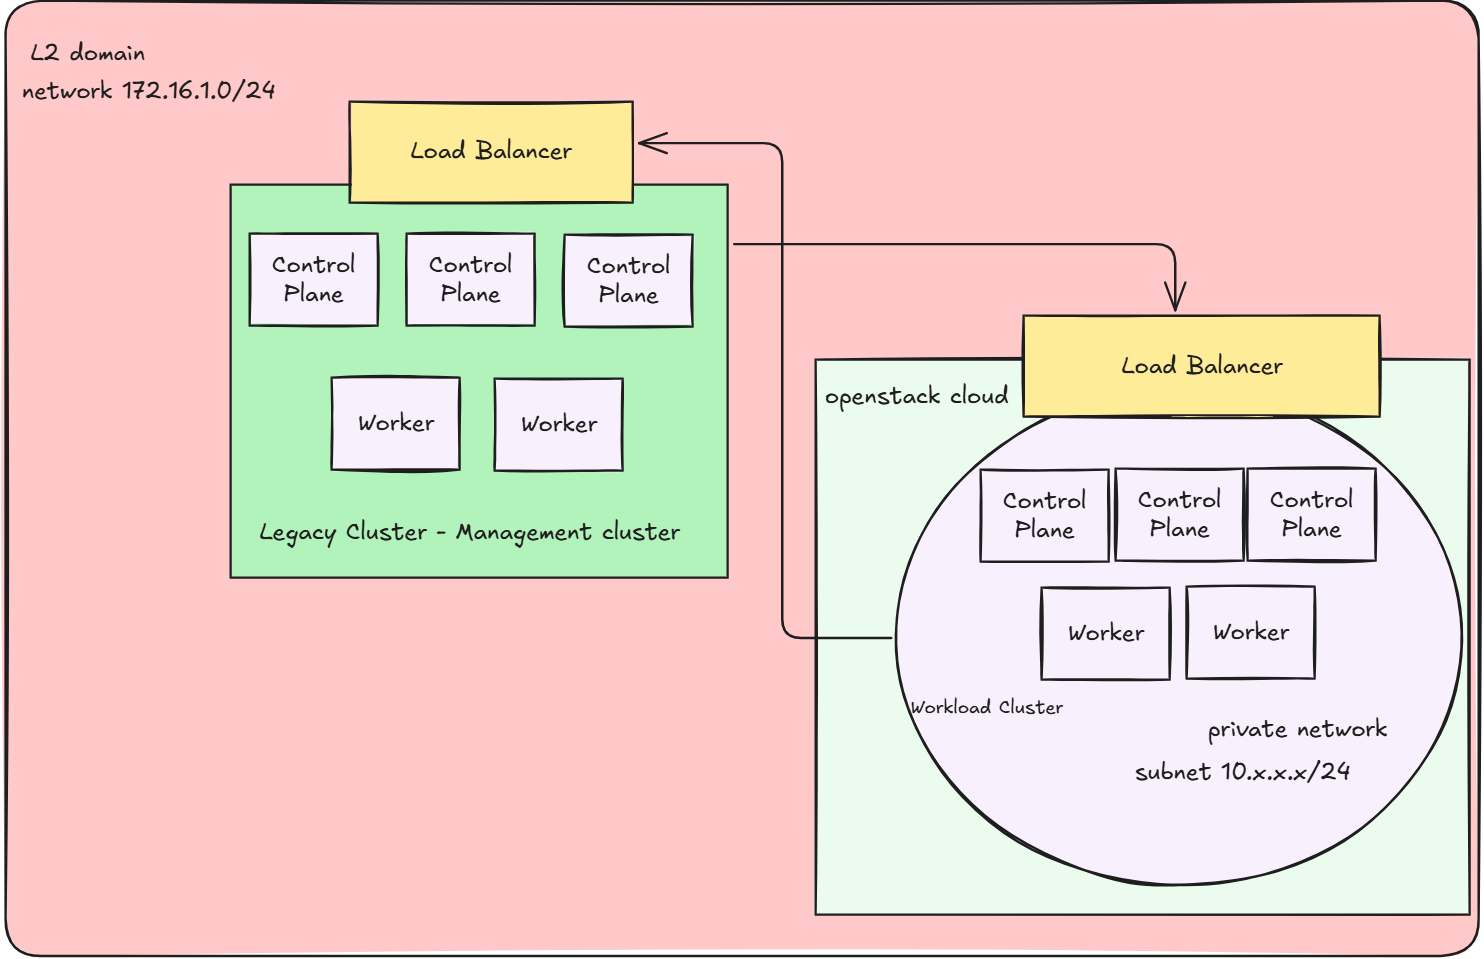
- For simplicity, I designed the external provider network of neutron, which is used to assign Floating IPs for resources, to reside in the same L2 domain with my Legacy Cluster. This results in the workload cluster’s kube-api server is accessible from the management cluster, allows the management cluster to communicate the workload’s cluster through it’s public kube-api server endpoint
The diagram below illustrates the network and architecture:
Images: Kubernetes-compatible VM images uploaded to Glance
The image should contains prebuilt tools like kubeadm, kubelet, containerd,… in order to work with kubeadm-based cluster because I’ll be using kubeadm bootstrap provider. Here is the github repository that I used to build the images kubernetes-sigs/image-builder. Here’s the tutorial that we could follow to build image.
Initialize Management Cluster
-
Start with a management cluster (can be kind-based or a small k0s/kubeadm cluster). For now I have an existing cluster mentioned above, which is quite decent. Thus I decided to promote that on-premise cluster into a management cluster, which I’ll call a Legacy Cluster from now on.
-
Install Cluster API components for OpenStack:
# In order to use some experimental features, e.g ClusterClass, enabling the following flag is required
export CLUSTER_TOPOLOGY=true
clusterctl init --infrastructure openstack
It will deploy controlllers as well as CRDs for CAPI
clusterctl init --infrastructure openstack
Fetching providers
Skipping installing cert-manager as it is already installed
Installing provider="cluster-api" version="v1.10.5" targetNamespace="capi-system"
Installing provider="bootstrap-kubeadm" version="v1.10.5" targetNamespace="capi-kubeadm-bootstrap-system"
Installing provider="control-plane-kubeadm" version="v1.10.5" targetNamespace="capi-kubeadm-control-plane-system"
Installing provider="infrastructure-openstack" version="v0.12.4" targetNamespace="capo-system"

Your management cluster has been initialized successfully!

You can now create your first workload cluster by running the following:

  clusterctl generate cluster [name] --kubernetes-version [version] | kubectl apply -f -

Now my legacy cluster has been turned into a management cluster and ready to provision other clusters
Defining the Workload Cluster: From YAML to Reality
Now that the management cluster is in place, the next step is to describe the desired state of the workload cluster.
CAPI does this through a set of Custom Resource Definitions (CRDs), each focusing on a different layer of the cluster.
I’ll break it down into four key parts:
- Cluster – the top-level resource that ties everything together (infrastructure + control plane).
- Control Plane – defines how the Kubernetes API servers and etcd are deployed and managed.
- Worker Nodes (Node Pool) – the scalable pool of worker machines that run workloads.
- Optional Add-ons – extras like a CNI plugin or Cluster Autoscaler to complete the cluster.
Cloud Credentials Preparation
Cluster API needs access to OpenStack APIs to create networks, servers, and volumes. This is done by creating a Kubernetes Secret that stores your clouds.yaml
apiVersion: v1
kind: Secret
metadata:
  name: capi-ubuntu-openstack-cloud-config
  namespace: capi-ubuntu-openstack
  labels:
    clusterctl.cluster.x-k8s.io/move: "true"
type: Opaque
data:
  cacert: Cg==
  clouds.yaml: # base64-encoded content from clouds.yaml
How this is used later
When you define the OpenStackCluster and OpenStackMachineTemplate, you’ll reference this secret like so:
spec:
  identityRef:
    kind: Secret
    name: capi-ubuntu-openstack-cloud-config
That’s how CAPI controllers authenticate against your OpenStack APIs.
Building the Cluster
The Cluster CRD ties everything together. It doesn’t launch machines itself — instead, it points to:
A KubeadmControlPlane (how to bootstrap control plane nodes).
An OpenStackCluster (how to talk to the underlying OpenStack infrastructure).
apiVersion: cluster.x-k8s.io/v1beta1
kind: Cluster
metadata:
  name: capi-ubuntu-openstack
  namespace: capi-ubuntu-openstack
  labels:
    cloud: capi-ubuntu-openstack
spec:
  clusterNetwork:
    pods:
      # CNI network CIDRs for the pods
      cidrBlocks:
      - <POD CIDR Block>
    serviceDomain: cluster.local
  controlPlaneRef:
    apiVersion: controlplane.cluster.x-k8s.io/v1beta1
    kind: KubeadmControlPlane
    name: capi-ubuntu-openstack-control-plane
  infrastructureRef:
    apiVersion: infrastructure.cluster.x-k8s.io/v1beta1
    kind: OpenStackCluster
    name: capi-ubuntu-openstack
---
apiVersion: infrastructure.cluster.x-k8s.io/v1beta1
kind: OpenStackCluster
metadata:
  name: capi-ubuntu-openstack
  namespace: capi-ubuntu-openstack
spec:
  # Enabled LB for API server to communicate with legacy cluster
  apiServerLoadBalancer:
    enabled: true
  externalNetwork:
  # The network ID of external IP pools which assigns FIP to LB for API server
    id: <External-NetworkID>
  identityRef:
    cloudName: openstack
    name: capi-ubuntu-openstack-cloud-config
  # Define the Security Groups. Basically, we will have 2 groups, control plane and worker. Each group will be assigned the respective rules
  managedSecurityGroups:
    allowAllInClusterTraffic: true
    allNodesSecurityGroupRules:
    - description: Created by cluster-api-provider-openstack - BGP (calico)
      direction: ingress
      etherType: IPv4
      name: BGP (Calico)
      portRangeMax: 179
      portRangeMin: 179
      protocol: tcp
      remoteManagedGroups:
      - controlplane
      - worker
    - description: Created by cluster-api-provider-openstack - IP-in-IP (calico)
      direction: ingress
      etherType: IPv4
      name: IP-in-IP (calico)
      protocol: "4"
      remoteManagedGroups:
      - controlplane
      - worker
  # Create a subnet for my cluster to live in
  managedSubnets:
  - cidr: <Subnet CIDR block>
    dnsNameservers:
    - <NameServer1>
    - <NameServer2>
Notice how this YAML doesn’t specify any nodes yet. It’s simply saying:
➡️ “This cluster will use kubeadm for control plane, and OpenStack for infra”
Control Plane – The Brain of Your Kubernetes
With our Cluster object in place, the next step is telling CAPI how to manage the control plane. In Cluster API, this is handled by the KubeadmControlPlane resource (used with the kubeadm bootstrap provider).
Think of it as answering the key questions:
-
How many control plane nodes should exist?
-
Which Kubernetes version should they run?
-
How should the control plane’s components be configured?
-
Are there any kubeadm-specific tweaks, or pre/post bootstrap steps?
Here’s what my setup looks like:
Control Plane Definition
apiVersion: controlplane.cluster.x-k8s.io/v1beta1
kind: KubeadmControlPlane
metadata:
  name: capi-ubuntu-openstack-control-plane
  namespace: capi-ubuntu-openstack
spec:
  kubeadmConfigSpec:
    clusterConfiguration:
      controllerManager:
        extraArgs:
          cloud-provider: external
    files: []
    initConfiguration:
      nodeRegistration:
        kubeletExtraArgs:
          cloud-provider: external
          provider-id: openstack:///'{{ instance_id }}'
        name: '{{ local_hostname }}'
    joinConfiguration:
      nodeRegistration:
        kubeletExtraArgs:
          cloud-provider: external
          provider-id: openstack:///'{{ instance_id }}'
        name: '{{ local_hostname }}'
  machineTemplate:
    infrastructureRef:
      apiVersion: infrastructure.cluster.x-k8s.io/v1beta1
      kind: OpenStackMachineTemplate
      name: capi-ubuntu-openstack-control-plane
  replicas: 3
  version: <k8s-version>
Here’s what this does for us:
-
HA control plane: 3 nodes for high availability.
-
Infrastructure-aware: Nodes are provisioned with an OpenStackMachineTemplate.
-
The cloud provider is set to external, which integrates with a cloud controller manager later.\
-
kubeadm bootstraps nodes with OpenStack-specific provider settings.
Granular kubelet tuning: Allows extra kubelet arguments doc
Control Plane Machines Template
The OpenStackMachineTemplate defines what VM specs the control plane nodes should have:
apiVersion: infrastructure.cluster.x-k8s.io/v1beta1
kind: OpenStackMachineTemplate
metadata:
  name: capi-ubuntu-openstack-control-plane
  namespace: capi-ubuntu-openstack
spec:
  template:
    spec:
      flavor: m1.k8s-master
      image:
        filter:
          name: <image-name>
      sshKeyName: <SSH-KeyName>>
Key points:
-
Flavor: Determines compute resources (CPU/RAM).
-
Image: The prebuilt Ubuntu VM image with kubeadm, kubelet, and container runtime.
-
SSH Key: Allows admin to ssh to the nodes
With this, our control plane is fully defined and ready for the management cluster to bring it to life.
Worker Nodes (Node Pools) – Powering Your Workloads
Once the control plane is defined and ready to be deployed, the next step is to define where your applications will actually run: the worker nodes. In CAPI, worker nodes are managed via MachineDeployments, which give you fine-grained control over how many nodes you want, how they are provisioned, and how they scale.
Think of MachineDeployments like a Deployment for VMs:
-
They manage replicas (number of nodes).
-
They allow scaling, even dynamically via Cluster Autoscaler.
-
They reference MachineTemplates and KubeadmConfigTemplates to configure how each node boots and what resources it gets.
-
Labels, taints, and kubelet extra args help you customize node behavior.
Here’s a practical example of how I set up two worker node pools: a “Normal” pool for general workloads, and a “Small” pool for lightweight or bursty workloads.
Bootstrap Config for Worker Nodes
# Worker Nodes sections
apiVersion: bootstrap.cluster.x-k8s.io/v1beta1
kind: KubeadmConfigTemplate
metadata:
  name: capi-ubuntu-openstack-config-template
  namespace: capi-ubuntu-openstack
spec:
  template:
    spec:
      files: []
      joinConfiguration:
        nodeRegistration:
          kubeletExtraArgs:
            cloud-provider: external
            provider-id: openstack:///'{{ instance_id }}'
          name: '{{ local_hostname }}'
This template ensures every worker node registers correctly with the control plane and integrates with the external OpenStack cloud provider.
Normal Worker Pool
# Normal Pool
apiVersion: cluster.x-k8s.io/v1beta1
kind: MachineDeployment
metadata:
  name: capi-ubuntu-openstack-normal-worker
  namespace: capi-ubuntu-openstack
  labels:
    cluster.x-k8s.io/cluster-name: capi-ubuntu-openstack
  annotations:
    cluster.x-k8s.io/cluster-api-autoscaler-node-group-min-size: "0"
    cluster.x-k8s.io/cluster-api-autoscaler-node-group-max-size: "2"
    capacity.cluster-autoscaler.kubernetes.io/memory: "8G"
    capacity.cluster-autoscaler.kubernetes.io/cpu: "4"
    capacity.cluster-autoscaler.kubernetes.io/ephemeral-disk: "30Gi"
spec:
  clusterName: capi-ubuntu-openstack
  replicas: 0
  selector:
    matchLabels: null
  template:
    spec:
      bootstrap:
        configRef:
          apiVersion: bootstrap.cluster.x-k8s.io/v1beta1
          kind: KubeadmConfigTemplate
          name: capi-ubuntu-openstack-config-template
      clusterName: capi-ubuntu-openstack
      failureDomain: nova
      infrastructureRef:
        apiVersion: infrastructure.cluster.x-k8s.io/v1beta1
        kind: OpenStackMachineTemplate
        name: capi-ubuntu-openstack-normal-worker
      version: <k8s-version>
Normal Worker Machine Template
apiVersion: infrastructure.cluster.x-k8s.io/v1beta1
kind: OpenStackMachineTemplate
metadata:
  name: capi-ubuntu-openstack-normal-worker
  namespace: capi-ubuntu-openstack
spec:
  template:
    spec:
      flavor: m1.k8s-worker
      image:
        filter:
          name: <image-name>
      sshKeyName: <SSH-KeyName>
Small Worker Pool
apiVersion: cluster.x-k8s.io/v1beta1
kind: MachineDeployment
metadata:
  name: capi-ubuntu-openstack-small-worker
  namespace: capi-ubuntu-openstack
  labels:
    cluster.x-k8s.io/cluster-name: capi-ubuntu-openstack
  annotations:
    cluster.x-k8s.io/cluster-api-autoscaler-node-group-min-size: "0"
    cluster.x-k8s.io/cluster-api-autoscaler-node-group-max-size: "2"
    capacity.cluster-autoscaler.kubernetes.io/memory: "4G"
    capacity.cluster-autoscaler.kubernetes.io/cpu: "2"
    capacity.cluster-autoscaler.kubernetes.io/ephemeral-disk: "30Gi"
spec:
  clusterName: capi-ubuntu-openstack
  replicas: 0
  selector:
    matchLabels: null
  template:
    spec:
      bootstrap:
        configRef:
          apiVersion: bootstrap.cluster.x-k8s.io/v1beta1
          kind: KubeadmConfigTemplate
          name: capi-ubuntu-openstack-config-template
      clusterName: capi-ubuntu-openstack
      failureDomain: nova
      infrastructureRef:
        apiVersion: infrastructure.cluster.x-k8s.io/v1beta1
        kind: OpenStackMachineTemplate
        name: capi-ubuntu-openstack-small-worker
      version: <k8s-version>
Small Worker Machine Template
apiVersion: infrastructure.cluster.x-k8s.io/v1beta1
kind: OpenStackMachineTemplate
metadata:
  name: capi-ubuntu-openstack-small-worker
  namespace: capi-ubuntu-openstack
spec:
  template:
    spec:
      flavor: m1.k8s-worker-small
      image:
        filter:
          name: <image-name>
      sshKeyName: <SSH-KeyName>
✅ Key Highlights
-
Each pool has its own flavor, size, and autoscaler annotations.
-
Initial replicas are set to 0 so Cluster Autoscaler can scale from zero.
-
Node pools reference a shared KubeadmConfigTemplate for consistency.
-
This setup allows fine-grained control and flexible scaling across workloads.
⚡ Tip: Autoscaling From Zero
Simply setting replicas: 0 is not enough for Cluster Autoscaler to scale from zero. Some providers (including OpenStack) don’t know the size of nodes that don’t exist yet.
That’s where capacity annotations come in:
capacity.cluster-autoscaler.kubernetes.io/memory: "4G"
capacity.cluster-autoscaler.kubernetes.io/cpu: "2"
capacity.cluster-autoscaler.kubernetes.io/ephemeral-disk: "30Gi"
-
Minimum required: CPU and memory.
-
These values must match the expected resources of the nodes defined in your infrastructure template.
-
Disk size is optional but recommended.
💡 Without these annotations, the autoscaler cannot bring nodes to life, and your zero-replica node groups will fail to scale. Reference
Add-ons – Giving Your Cluster Its Superpowers
While the control plane orchestrates and the workers run workloads, add-ons bring the essential capabilities that make your cluster truly functional. Some add-ons are so critical, though, that your cluster won’t even get off the ground without them.
- CNI Plugin (Calico) – Networking is non-negotiable. Without a CNI, pods can’t communicate, kubeadm bootstrap will hang, and your cluster will be… stuck in limbo. Literally, it won’t start.
According to the Cluster API kubeadm bootstrap provider (CABPK):
Bootstrap Orchestration
CABPK supports multiple control plane machines initing at the same time. The generation of cloud-init scripts of different machines is orchestrated in order to ensure a cluster bootstrap process that will be compliant with the correct Kubeadm init/join sequence. More in detail:

1. cloud-config-data generation starts only after Cluster.Status.InfrastructureReady flag is set to true.

2. at this stage, cloud-config-data will be generated for the first control plane machine only, keeping on hold additional control plane machines existing in the cluster, if any (kubeadm init).

3. after the ControlPlaneInitialized conditions on the cluster object is set to true, the cloud-config-data for all the other machines are generated (kubeadm join/join —control-plane).
Without a CNI, the ControlPlaneInitialized condition never becomes true, and your cluster remains stuck waiting forever.
-
Cluster Autoscaler – Dynamically scales your worker nodes based on workload. When paired with capacity annotations on your MachineDeployments, it even allows scaling from zero.
-
Cloud Controller Manager (CCM) – Bridges Kubernetes with your cloud provider. For OpenStack, this manages floating IPs, volumes, LB provision,…
-
Optional Add-ons – Logging, monitoring, ingress controllers, or any custom tools that make your cluster production-ready.
I’ve structured the addons into a kustomization style
addons/
├── calico/
├── cluster-autoscaler/
└── openstack-cloud-controller-manager/
Handing off the addons deployment onto the workload cluster
CAPI defines methods to let the workload cluster to automatically deploy the addons you demand:
- Using Clusterresource CRD - The standard, declarative way to apply YAMLs for CNIs, Cluster Autoscaler, CCM, and more.
- Workload bootstrap using GitOps - An alternative where a GitOps agent pulls manifests from a repository. To be honest, I haven’t explored this yet, but it’s a promising method for multi-cluster automation.
ClusterResourceSet in CAPI
In Cluster API, ClusterResourceSet allows us to automatically apply Kubernetes resources (like ConfigMaps, Secrets, or manifests) to newly created workload clusters. This is extremely useful for bootstrapping clusters with networking, storage, or other essential components.
Basically, we handle two types of resources:
- Deployable resources (Manifests, ConfigMaps, etc.)
- We wrap them into a ConfigMap where the data field contains the resource specification.
- Secrets
- We encode the secret and put it into a Secret resource with type set to addons.cluster.x-k8s.io/resource-set.
However, we ran into a practical issue with Calico:
The ConfigMap "calico-install" is invalid: metadata.annotations: Too long: must have at most 262144 bytes
Embedding the full Calico YAML in a ConfigMap exceeded Kubernetes’ size limit.
Solution: instead of embedding the whole manifest, we delegate the installation to a Job that runs after the API server is ready.
# ServiceAccount & ClusterRoleBinding for the Job
apiVersion: v1
kind: ServiceAccount
metadata:
  name: calico-installer
  namespace: kube-system
---
apiVersion: rbac.authorization.k8s.io/v1
kind: ClusterRoleBinding
metadata:
  name: calico-installer-binding
subjects:
- kind: ServiceAccount
  name: calico-installer
  namespace: kube-system
roleRef:
  kind: ClusterRole
  name: cluster-admin
  apiGroup: rbac.authorization.k8s.io
---
# Job to install Calico dynamically
apiVersion: batch/v1
kind: Job
metadata:
  name: install-calico
  namespace: kube-system
spec:
  backoffLimit: 3
  completions: 1
  parallelism: 1
  template:
    spec:
      serviceAccountName: calico-installer
      restartPolicy: OnFailure
      # Bypass CNI because at this time, we dont have CNI installed yet
      hostNetwork: true
      # At this stage, we only have 1 control plane in place, we need to set toleration to schedule the pod on this control plane
      tolerations:
      - key: "node-role.kubernetes.io/control-plane"
        operator: "Exists"
        effect: "NoSchedule"
      initContainers:
      - name: wait-for-api
        image: busybox:1.36
        command:
        - /bin/sh
        - -c
        - |
          echo "Waiting for API server..."
          until nc -z ${KUBERNETES_SERVICE_HOST} ${KUBERNETES_SERVICE_PORT}; do sleep 5; done
      containers:
      - name: install-calico
        image: bitnami/kubectl:latest
        command:
        - /bin/sh
        - -c
        - |
          # Just a double check
          until kubectl get nodes; do sleep 5; done
          echo "API server ready, applying Calico..."
          kubectl apply -f https://raw.githubusercontent.com/projectcalico/calico/v3.30.2/manifests/calico.yaml
          # I think I could check the exit code of above command to trigger restart policy if needed.
To see how this approach fits into the broader cluster bootstrap, check out the full directory structure of our CAPI setup — including the Calico Job, ClusterResourceSets, and other addons — in the sanitized repository tree below.
.
├── addons
│   ├── calico
│   │   ├── calico-bootstrap-job.yaml
│   │   ├── calico-bootstrap-rbac.yaml
│   │   ├── clusterresourceset.yaml
│   │   └── kustomization.yaml
│   ├── cluster-autoscaler
│   │   ├── cluster-autoscaler.yaml.template
│   │   ├── clusterresourceset.yaml
│   │   ├── kustomization.yaml
│   │   └── secret.yaml
│   └── openstack-cloud-controller-manager
│       ├── clusterresourceset.yaml
│       ├── kustomization.yaml
│       ├── openstack-cloud-controller.yaml
│       └── secret.yaml
└── capi-ubuntu-openstack
    ├── capi-ubuntu-openstack.yaml
    └── kustomization.yaml
Each addon is organized in its own folder (Calico, Cluster Autoscaler, OpenStack CCM), making it easy to see how ClusterResourceSets, jobs, and secrets are structured.
The capi-ubuntu-openstack folder contains the main cluster manifests for your kubeadm-based CAPI cluster. All these manifests are available in a sanitized GitHub repository here for reference. You can browse, clone, and adapt them to your own homelab or OpenStack environment without exposing sensitive data
🚀 Hands-On: Deploying Our Scalable CAPI Cluster
Generate the deployment file for cluster autoscaler
There are some placeholders in the cluster-autoscaler.yaml.template file we need to substitute with our actual values
export NAMESPACE=capi-ubuntu-openstack
export CLUSTER_NAME=capi-ubuntu-openstack
envsubst < cluster-autoscaler.yaml.template > cluster-autoscaler-deployment.yaml
Apply kustomization file
kubectl apply -k capi-ubuntu-openstack/
configmap/calico-bootstrap-job created
configmap/calico-bootstrap-rbac created
configmap/cloud-provider-openstack created
configmap/cluster-autoscaler created
secret/capi-ubuntu-openstack-cloud-config created
secret/cloud-config created
secret/kubeconfig-secret created
clusterresourceset.addons.cluster.x-k8s.io/calico created
clusterresourceset.addons.cluster.x-k8s.io/cloud-provider-openstack created
clusterresourceset.addons.cluster.x-k8s.io/cluster-autoscaler-openstack created
kubeadmconfigtemplate.bootstrap.cluster.x-k8s.io/capi-ubuntu-openstack-config-template created
cluster.cluster.x-k8s.io/capi-ubuntu-openstack created
machinedeployment.cluster.x-k8s.io/capi-ubuntu-openstack-normal-worker created
machinedeployment.cluster.x-k8s.io/capi-ubuntu-openstack-small-worker created
kubeadmcontrolplane.controlplane.cluster.x-k8s.io/capi-ubuntu-openstack-control-plane created
openstackcluster.infrastructure.cluster.x-k8s.io/capi-ubuntu-openstack created
openstackmachinetemplate.infrastructure.cluster.x-k8s.io/capi-ubuntu-openstack-control-plane created
openstackmachinetemplate.infrastructure.cluster.x-k8s.io/capi-ubuntu-openstack-normal-worker created
openstackmachinetemplate.infrastructure.cluster.x-k8s.io/capi-ubuntu-openstack-small-worker created
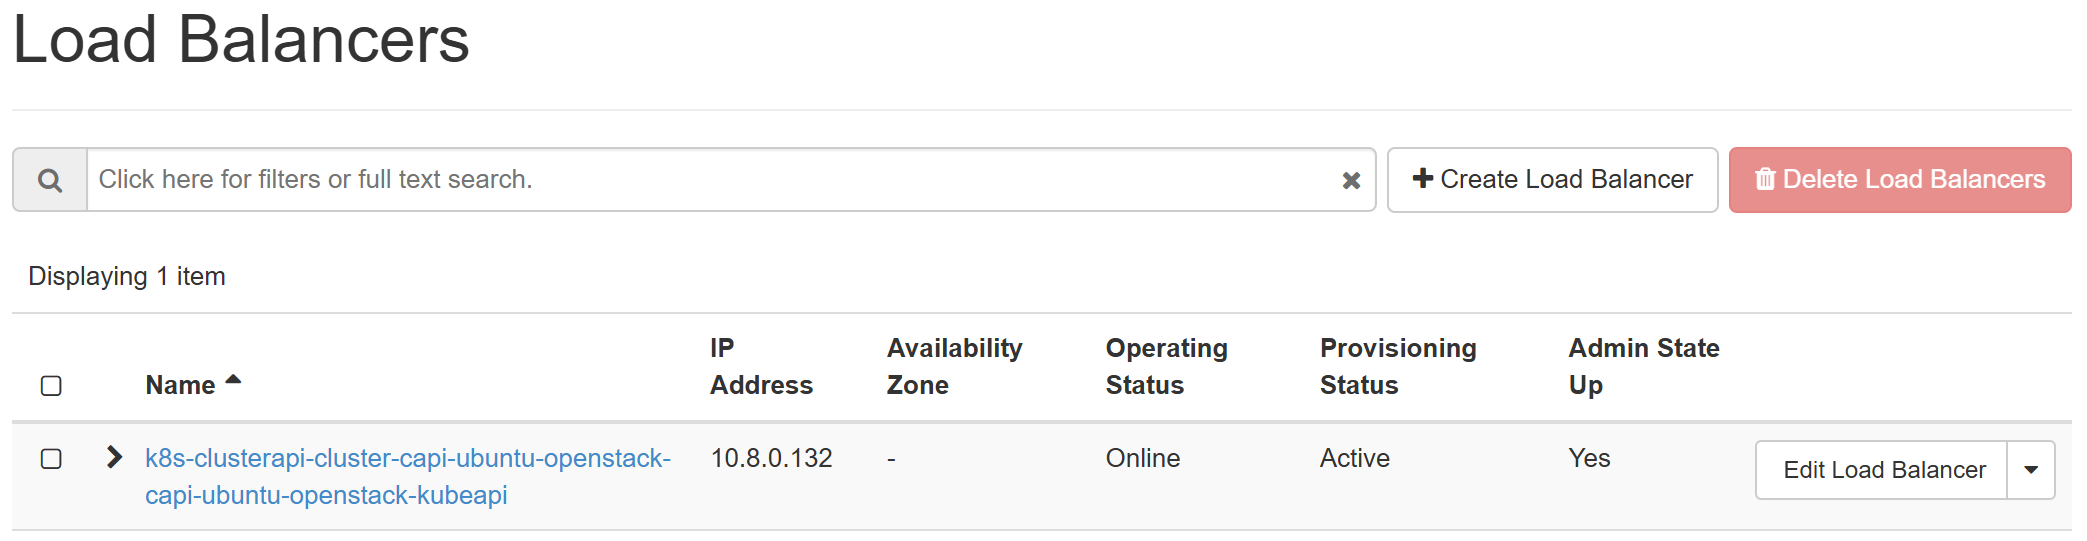
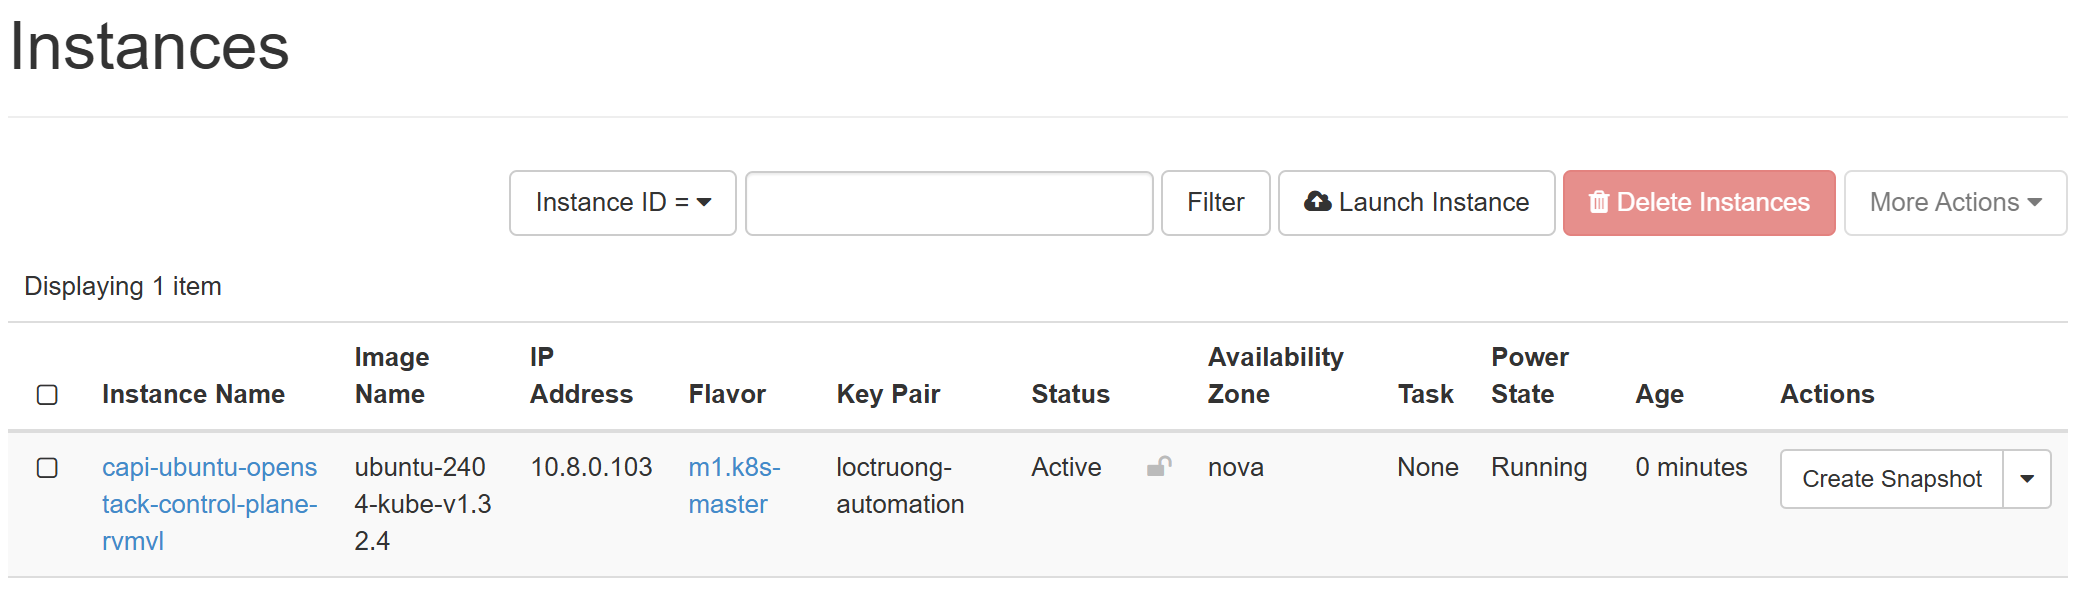
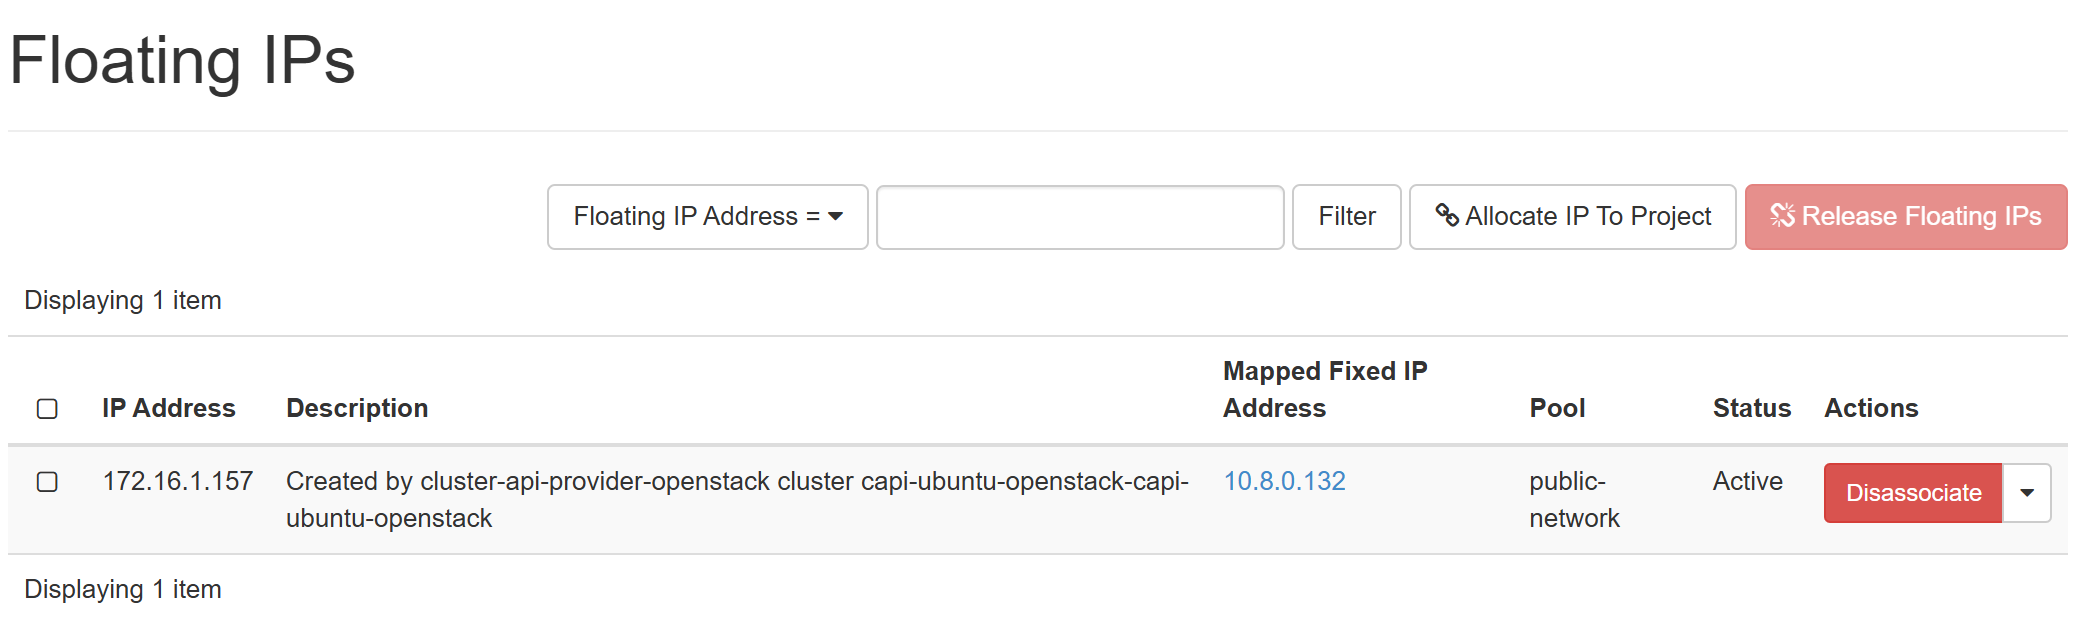
The CAPI will spin up the LB for kube-apiserver as well as the first control plane
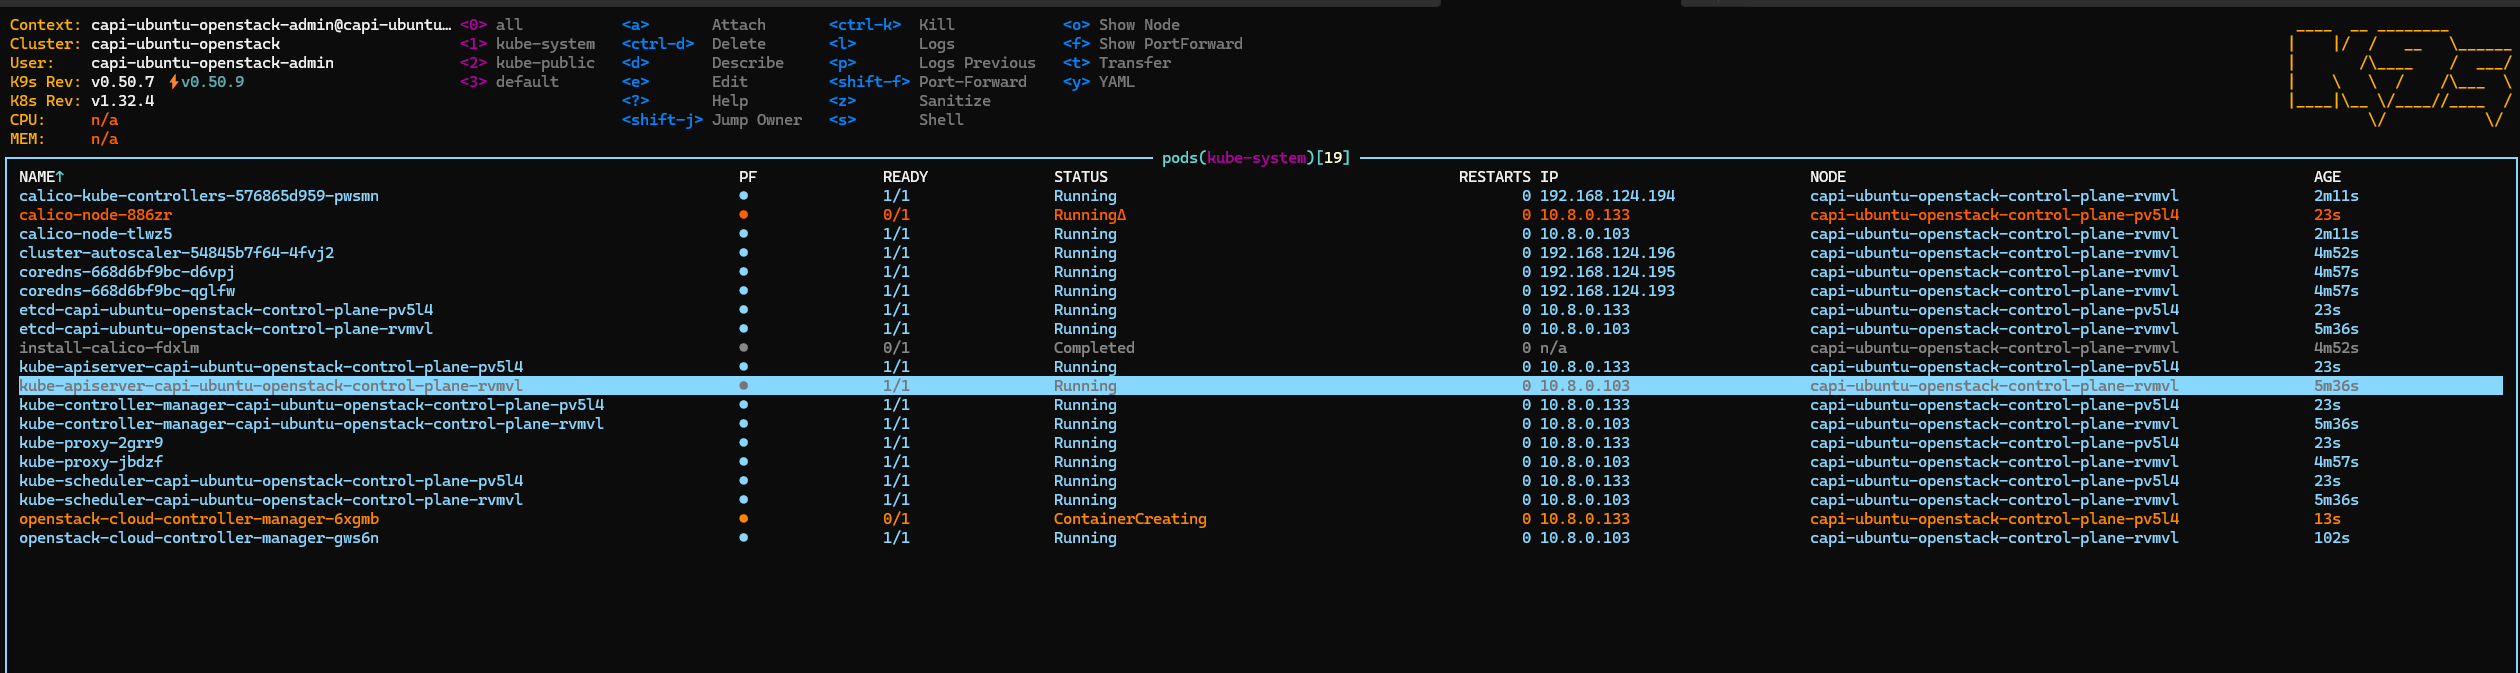
 Get the kubeconfig file of workload cluster and observe the resources creation
clusterctl get kubeconfig capi-ubuntu-openstack -n capi-ubuntu-openstack > ubuntu.conf
export KUBECONFIG=ubuntu.conf
k9s
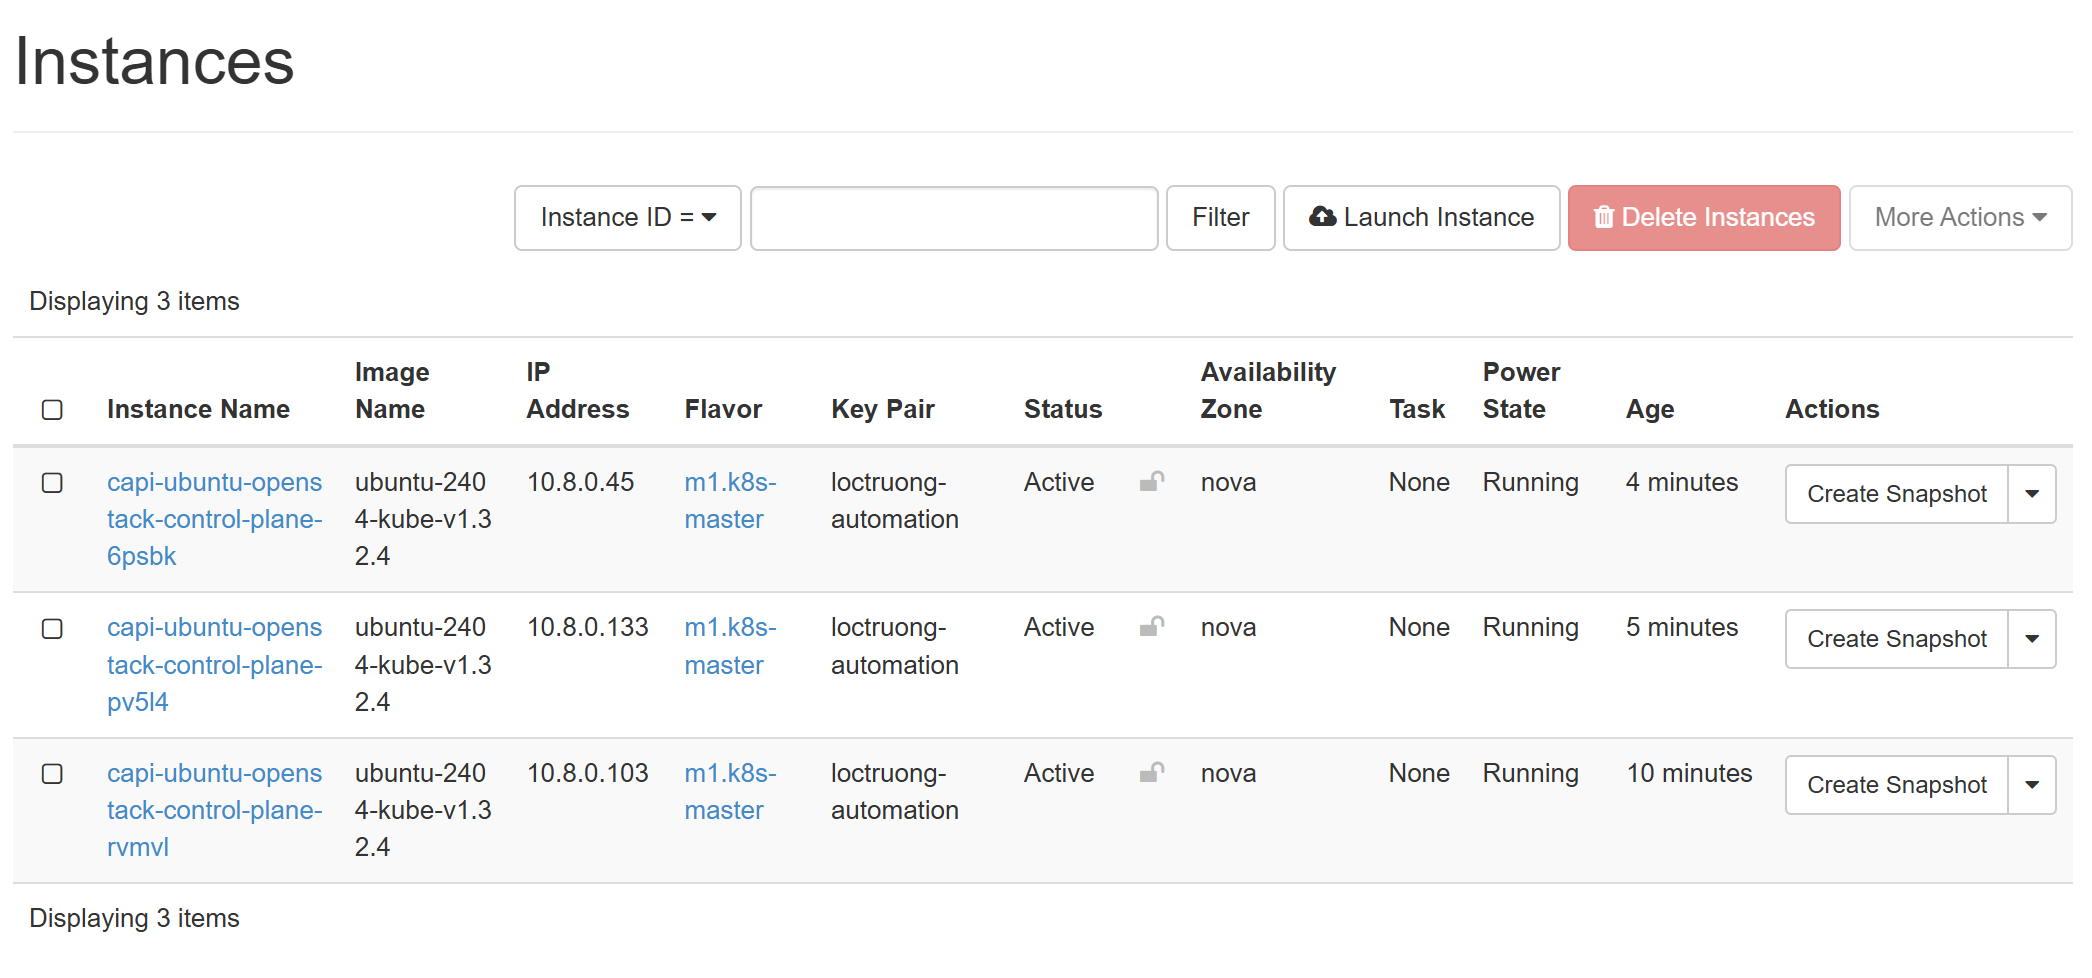
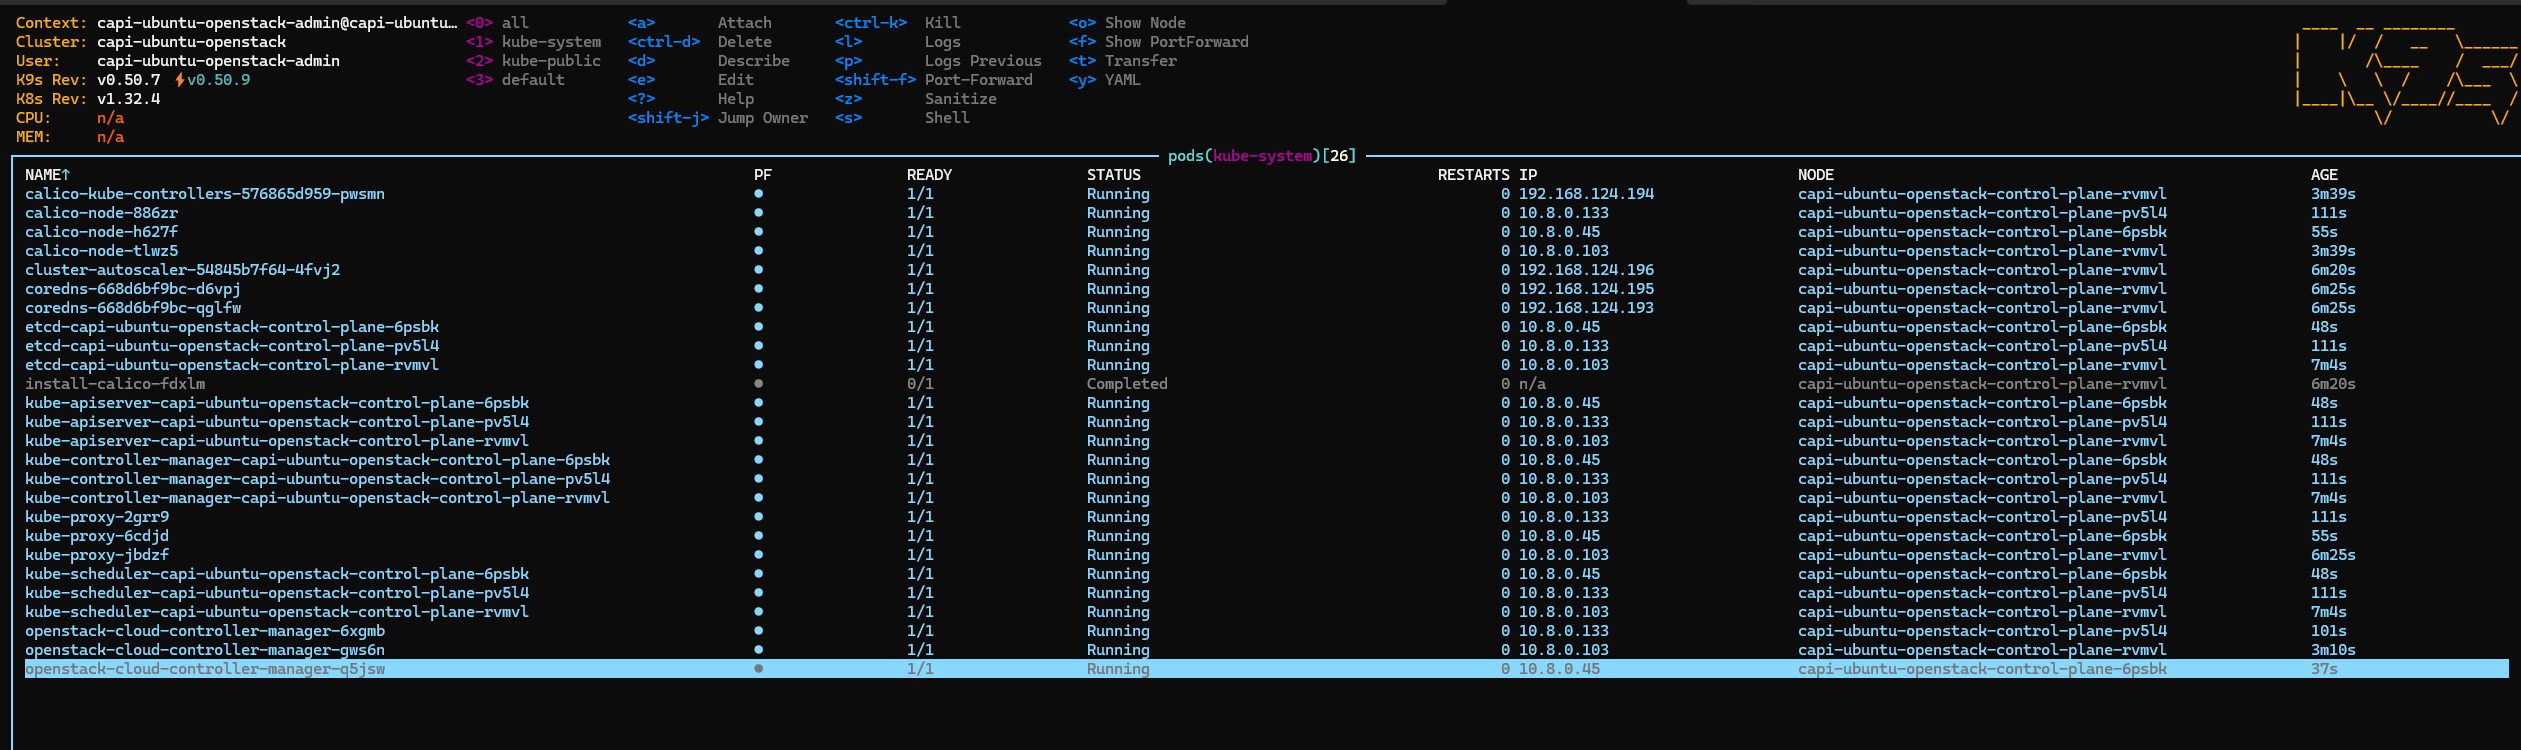
After installation period, we now have a cluster with 3 control planes up and running

🔥 Hands-On: Testing node autoscaling from Zero
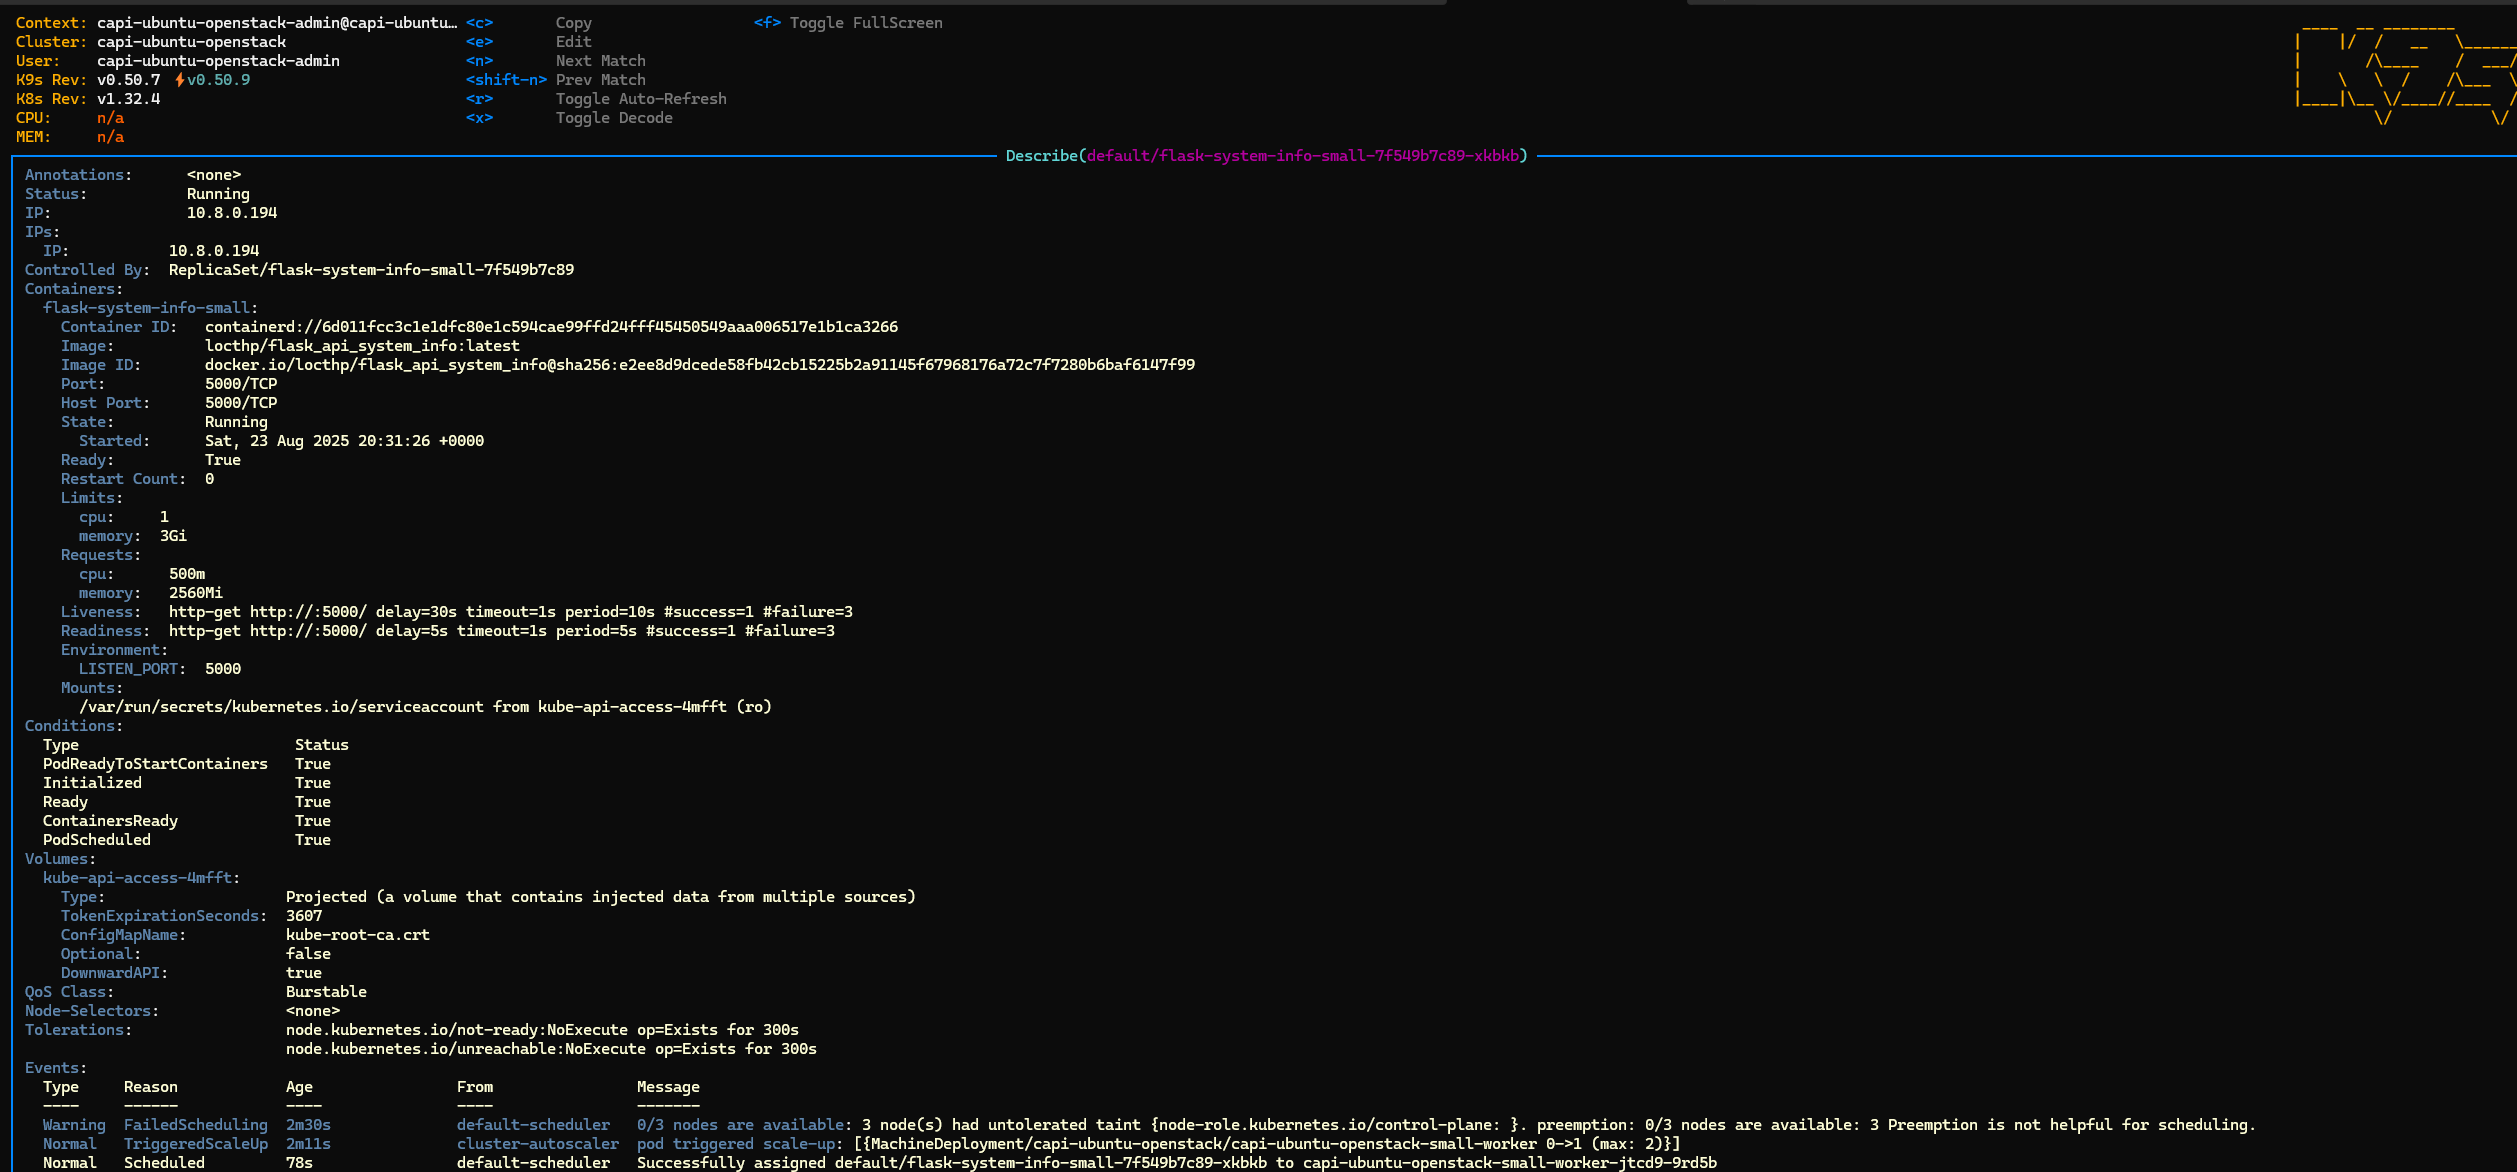
To validate our cluster’s autoscaling behavior, I prepared two workloads: Small worker pool: 2vCPU / 4GiB RAM per node
- We deploy a
flask-system-info-smallapp with replicas requiring ~2.5Gi memory and 500m CPU each. - The following deployment will force it to scale to nodes in the small pool. This happens because in cluster-autoscaler, I set –expander=least-waste, meaning the auto-scaler will prefer adding nodes from the pool which is least CPU-wise waste but still be able to fulfill the resource request
apiVersion: apps/v1
kind: Deployment
metadata:
  name: flask-system-info-small
  labels:
    app: flask-system-info-small
spec:
  replicas: 1
  selector:
    matchLabels:
      app: flask-system-info-small
  template:
    metadata:
      labels:
        app: flask-system-info-small
    spec:
      hostNetwork: true
      # Add pod anti-affinity to spread pods across nodes
      affinity:
        podAntiAffinity:
          preferredDuringSchedulingIgnoredDuringExecution:
          - weight: 100
            podAffinityTerm:
              labelSelector:
                matchExpressions:
                - key: app
                  operator: In
                  values:
                  - flask-system-info-small
              topologyKey: kubernetes.io/hostname
      containers:
      - name: flask-system-info-small
        image: locthp/flask_api_system_info:latest
        imagePullPolicy: Always
        env:
        - name: LISTEN_PORT
          value: "5000"
        ports:
        - containerPort: 5000
          protocol: TCP
        resources:
          requests:
            memory: "2.5Gi"
            cpu: "500m"
          limits:
            memory: "3Gi"
            cpu: "1000m"
        livenessProbe:
          httpGet:
            path: /
            port: 5000
          initialDelaySeconds: 30
          periodSeconds: 10
        readinessProbe:
          httpGet:
            path: /
            port: 5000
          initialDelaySeconds: 5
          periodSeconds: 5
---
apiVersion: v1
kind: Service
metadata:
  name: flask-system-info-small-service
spec:
  selector:
    app: flask-system-info-small
  ports:
  - protocol: TCP
    port: 80
    targetPort: 5000
  type: ClusterIP
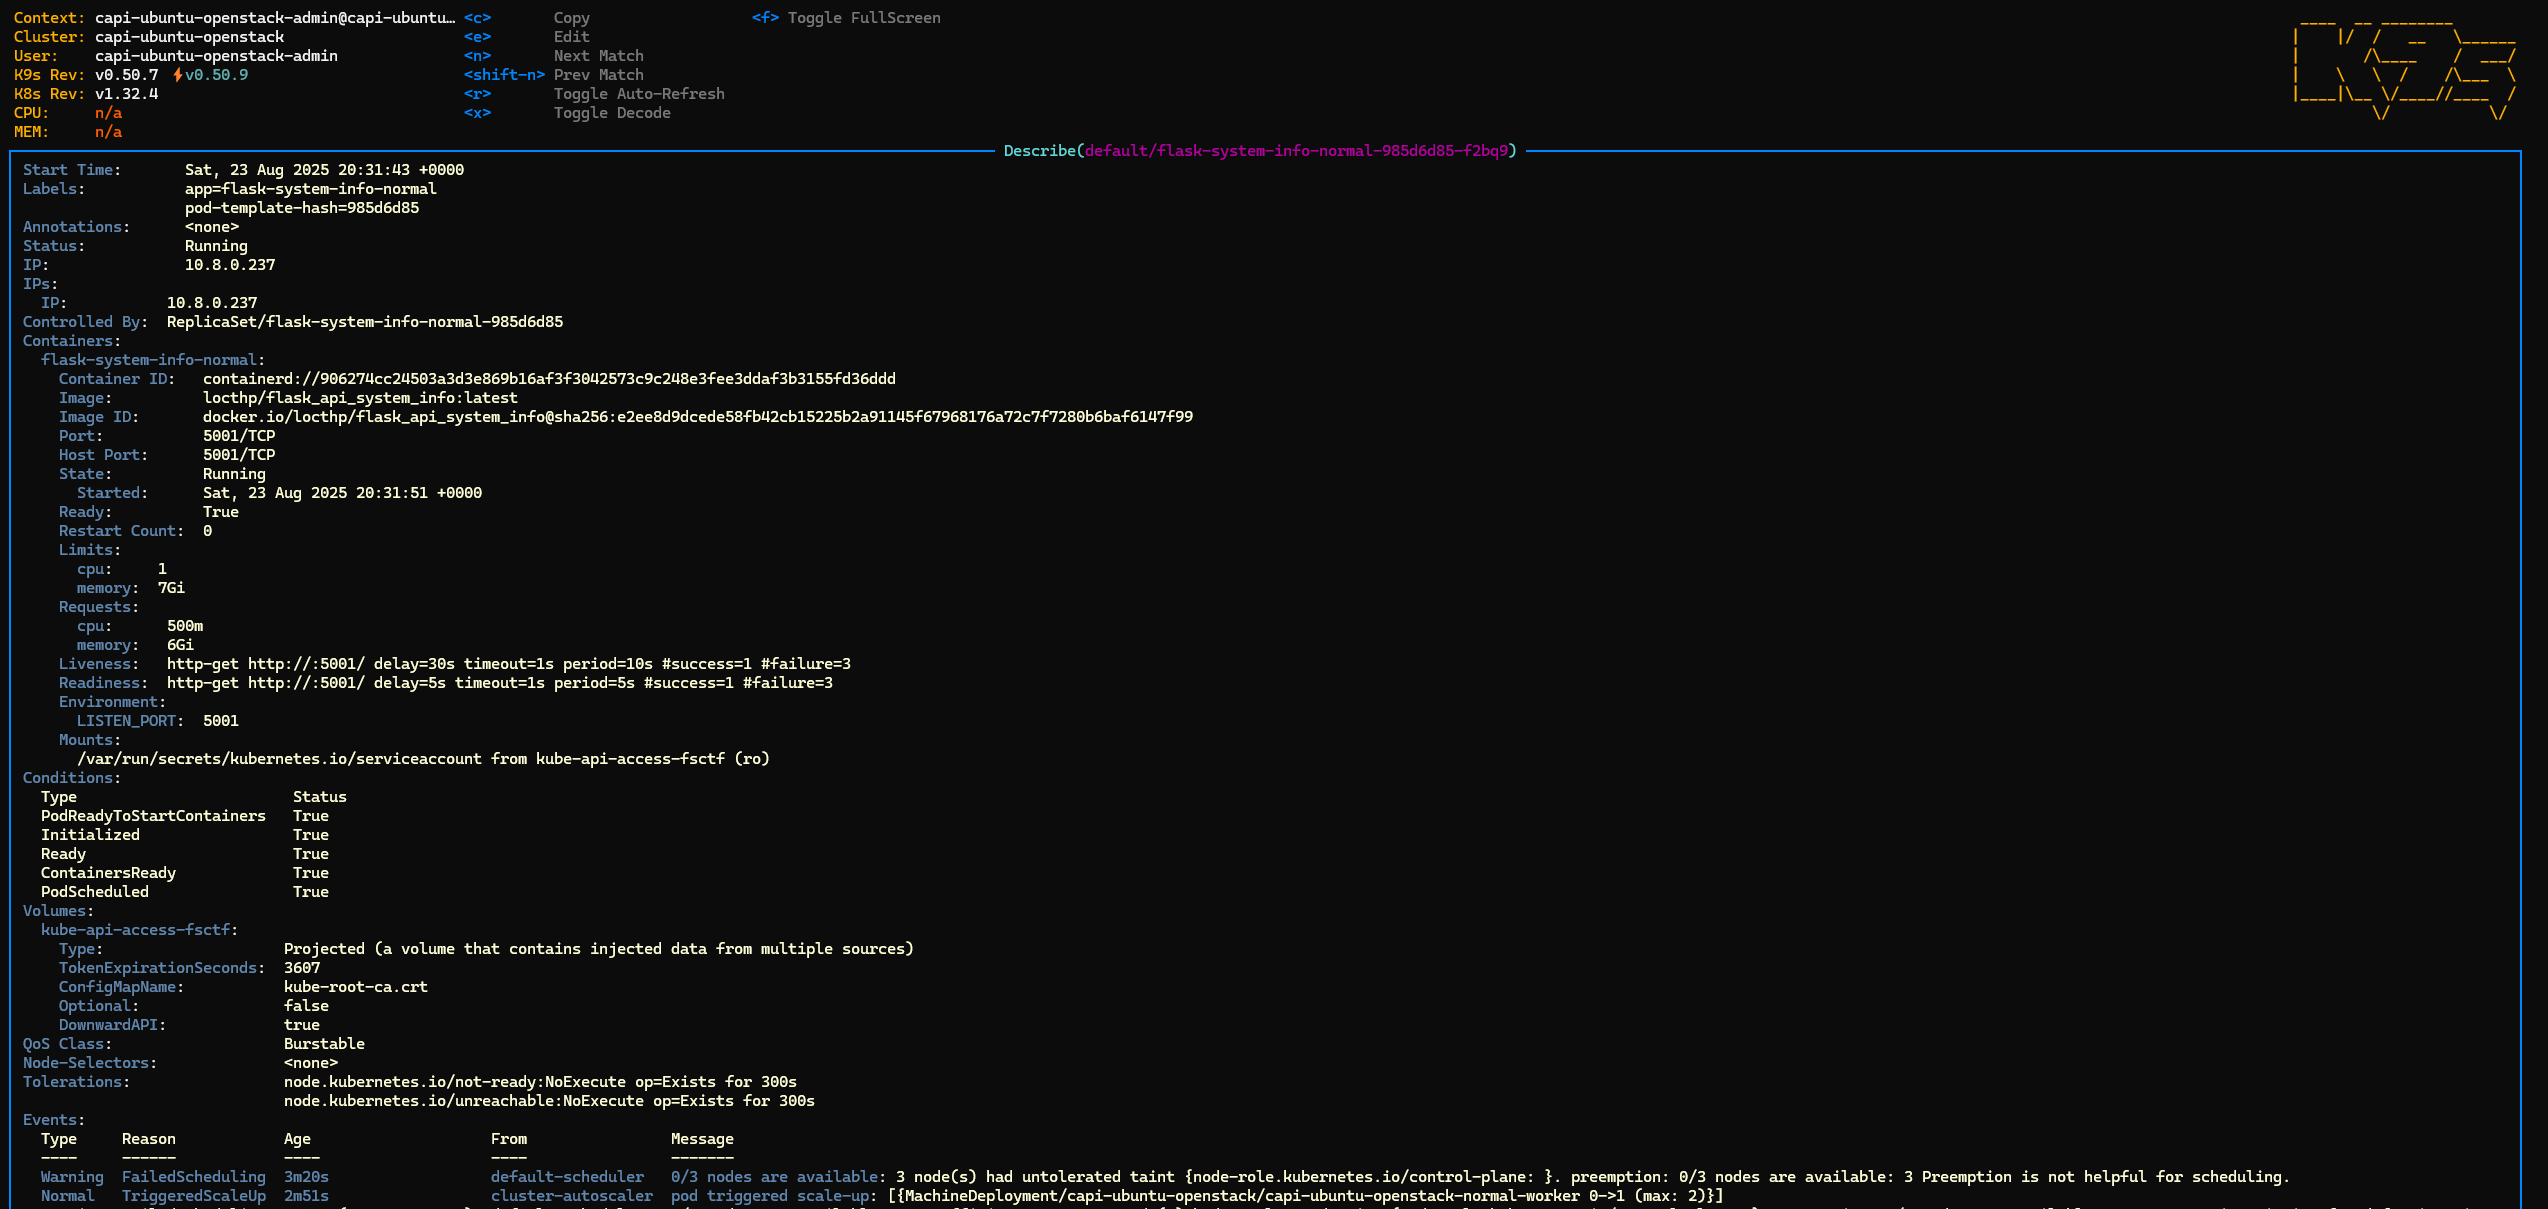
Normal worker pool: 4vCPU / 8GiB RAM per node
- Deployment:
flask-system-info-normalwith replicas requesting ~6Gi memory and 500m CPU each. - Autoscaler will scale the normal pool only if the small pool cannot accommodate the resource requests.
apiVersion: apps/v1
kind: Deployment
metadata:
  name: flask-system-info-normal
  labels:
    app: flask-system-info-normal
spec:
  replicas: 1
  selector:
    matchLabels:
      app: flask-system-info-normal
  template:
    metadata:
      labels:
        app: flask-system-info-normal
    spec:
      hostNetwork: true
      containers:
      - name: flask-system-info-normal
        image: locthp/flask_api_system_info:latest
        imagePullPolicy: Always
        env:
        - name: LISTEN_PORT
          value: "5001"
        ports:
        - containerPort: 5001
          protocol: TCP
        resources:
          requests:
            memory: "6Gi"
            cpu: "500m"
          limits:
            memory: "7Gi"
            cpu: "1000m"
        livenessProbe:
          httpGet:
            path: /
            port: 5001
          initialDelaySeconds: 30
          periodSeconds: 10
        readinessProbe:
          httpGet:
            path: /
            port: 5001
          initialDelaySeconds: 5
          periodSeconds: 5
---
apiVersion: v1
kind: Service
metadata:
  name: flask-system-info-normal-service
spec:
  selector:
    app: flask-system-info-normal
  ports:
  - protocol: TCP
    port: 80
    targetPort: 5001
  type: ClusterIP
About the Test Deployments
Each deployment simply runs a small Flask-based service that reports the system resources of the node it’s running on. This includes:
- CPU and memory usage
- Node IP addresses
- System uptime
These apps don’t do any heavy computation; they are designed purely to force the Cluster Autoscaler to scale nodes according to resource requests. By observing which nodes the pods land on, we can validate that the autoscaler correctly adds nodes to the appropriate pool (small or normal) and respects the --expander=least-waste strategy.
Deploy the Test Deployments
kubectl apply -f test-small.yaml
deployment.apps/flask-system-info-small created
service/flask-system-info-small-service created

kubectl apply -f test-normal.yaml
deployment.apps/flask-system-info-normal created
service/flask-system-info-normal-service created
- Small deployment triggered the scaling, the small pool
- Normal deployment triggered the scaling as well, the normal pool
- Checked the log of cluster scaler, it triggered the autoscaling through managment cluster

- Eventually, we got 2 worker nodes from 2 pools as well and ready deployments


🔥 Hands-On: Testing Cloud Controller Manager - Expose The Services Publicly
Now that our small and normal worker deployments are running, let’s expose them through an ingress using an external load balancer. This allows us to validate our Cloud Controller Manager (CCM) functionality.
- Install Ingress Controller
kubectl apply -f https://raw.githubusercontent.com/kubernetes/ingress-nginx/controller-v1.13.1/deploy/static/provider/cloud/deploy.yaml
namespace/ingress-nginx created
serviceaccount/ingress-nginx created
serviceaccount/ingress-nginx-admission created
role.rbac.authorization.k8s.io/ingress-nginx created
role.rbac.authorization.k8s.io/ingress-nginx-admission created
clusterrole.rbac.authorization.k8s.io/ingress-nginx created
clusterrole.rbac.authorization.k8s.io/ingress-nginx-admission created
rolebinding.rbac.authorization.k8s.io/ingress-nginx created
rolebinding.rbac.authorization.k8s.io/ingress-nginx-admission created
clusterrolebinding.rbac.authorization.k8s.io/ingress-nginx created
clusterrolebinding.rbac.authorization.k8s.io/ingress-nginx-admission created
configmap/ingress-nginx-controller created
service/ingress-nginx-controller created
service/ingress-nginx-controller-admission created
deployment.apps/ingress-nginx-controller created
job.batch/ingress-nginx-admission-create created
job.batch/ingress-nginx-admission-patch created
ingressclass.networking.k8s.io/nginx created
validatingwebhookconfiguration.admissionregistration.k8s.io/ingress-nginx-admission created
✅ Ingress controller is installed, and the external LB is provisioned.

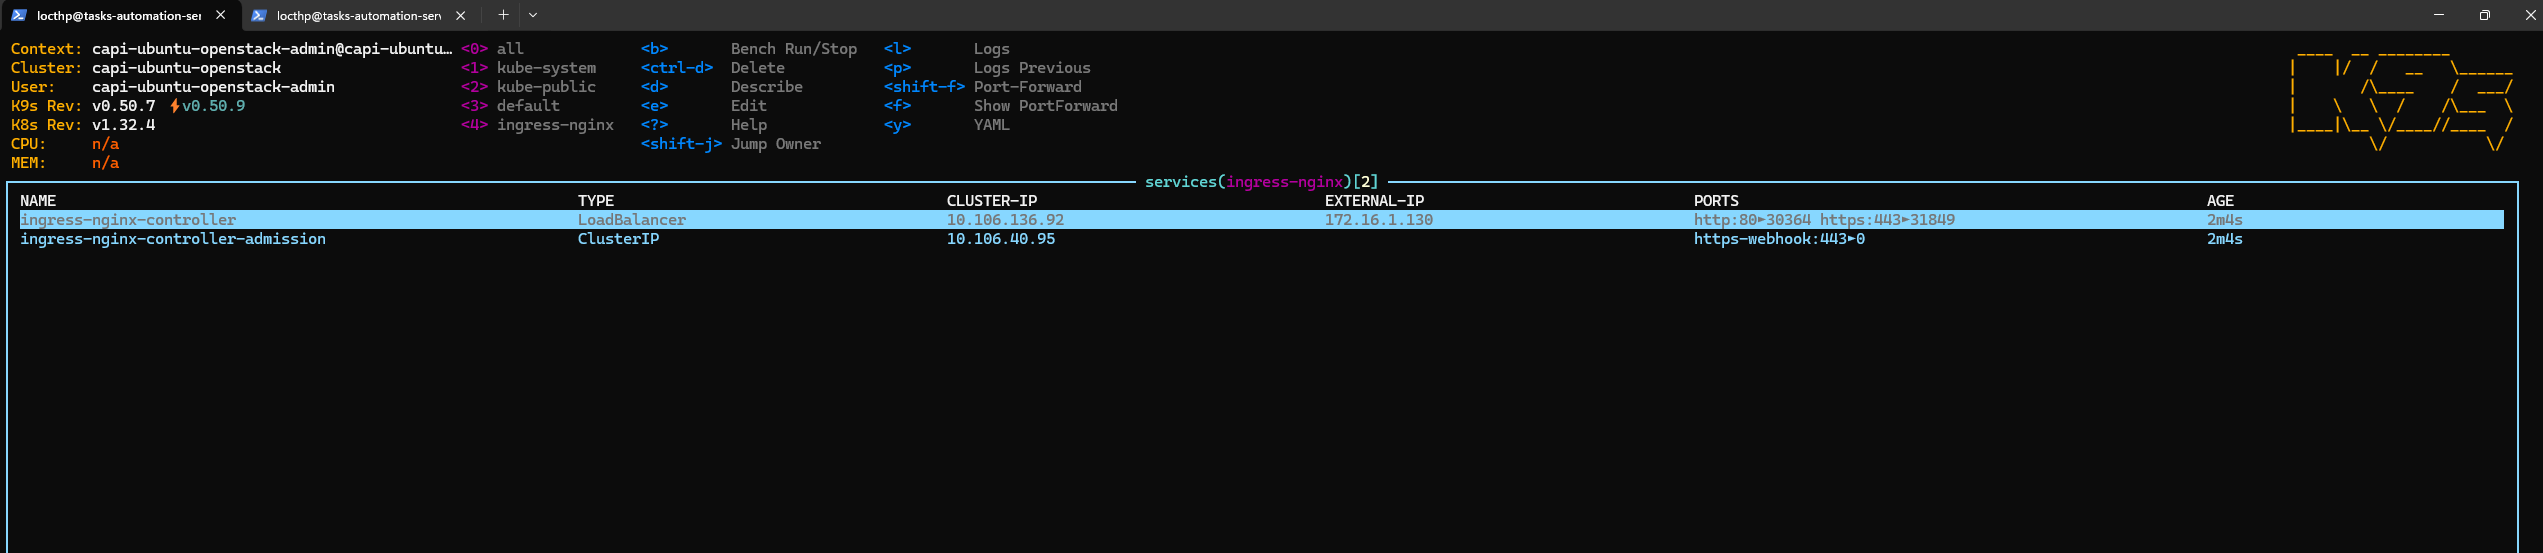
- Create Ingress Resource
Next, we define an Ingress resource to route traffic to our small and normal services:
apiVersion: networking.k8s.io/v1
kind: Ingress
metadata:
  name: flask-system-info-ingress
  annotations:
    nginx.ingress.kubernetes.io/rewrite-target: /
    nginx.ingress.kubernetes.io/ssl-redirect: "false"
spec:
  ingressClassName: nginx
  rules:
  - http:
      paths:
      - path: /small
        pathType: Prefix
        backend:
          service:
            name: flask-system-info-small-service
            port:
              number: 80

      - path: /normal
        pathType: Prefix
        backend:
          service:
            name: flask-system-info-normal-service
            port:
              number: 80
- Test access
locthp@tasks-automation-server:~$ curl 172.16.1.130/small
{
  "hostname": "capi-ubuntu-openstack-small-worker-jtcd9-9rd5b",
  "main_ip": "10.8.0.194",
  "cpu_count": 2,
  "memory_gb": 3.82,
  "uptime_seconds": 969.43,
  "uptime_formatted": "16m 9s",
  "interfaces": {
    "lo": "127.0.0.1",
    "ens3": "10.8.0.194",
    "tunl0": "192.168.224.128"
  }
}locthp@tasks-automation-server:~$ curl 172.16.1.130/normal
{
  "hostname": "capi-ubuntu-openstack-normal-worker-lcqjv-hn4xs",
  "main_ip": "10.8.0.237",
  "cpu_count": 4,
  "memory_gb": 7.76,
  "uptime_seconds": 982.59,
  "uptime_formatted": "16m 22s",
  "interfaces": {
    "lo": "127.0.0.1",
    "ens3": "10.8.0.237",
    "tunl0": "192.168.7.64"
  }
}locthp@tasks-automation-server:~$
🧹 Cleaning Up & Testing Scale-Down
After validating that the Cluster Autoscaler successfully scaled nodes up, it’s time to test scale-down behavior. First, we clean up the test workloads:
kubectl delete -f https://raw.githubusercontent.com/kubernetes/ingress-nginx/controller-v1.13.1/deploy/static/provider/cloud/deploy.yaml
kubectl delete test-small.yaml
kubectl delete -f test-normal.yaml
kubectl delete -f ingress.yaml
After about 10 minutes (the default idle time before the Cluster Autoscaler triggers scale-down), we observe the scaling-down event:

🔍 What’s Happening
-
When a node no longer hosts any non-DaemonSet pods, Cluster Autoscaler taints it with DeletionCandidateOfClusterAutoscaler=
:PreferNoSchedule. This marks it as a removal candidate. By default, the autoscaler waits 10 minutes (--scale-down-unneeded-time) before proceeding to delete the node if it remains idle -
Idle nodes are then removed from the cluster, returning it to its minimal state.
-
This demonstrates that the autoscaler not only handles scale-up effectively but also optimizes resource usage by scaling down when nodes are no longer needed
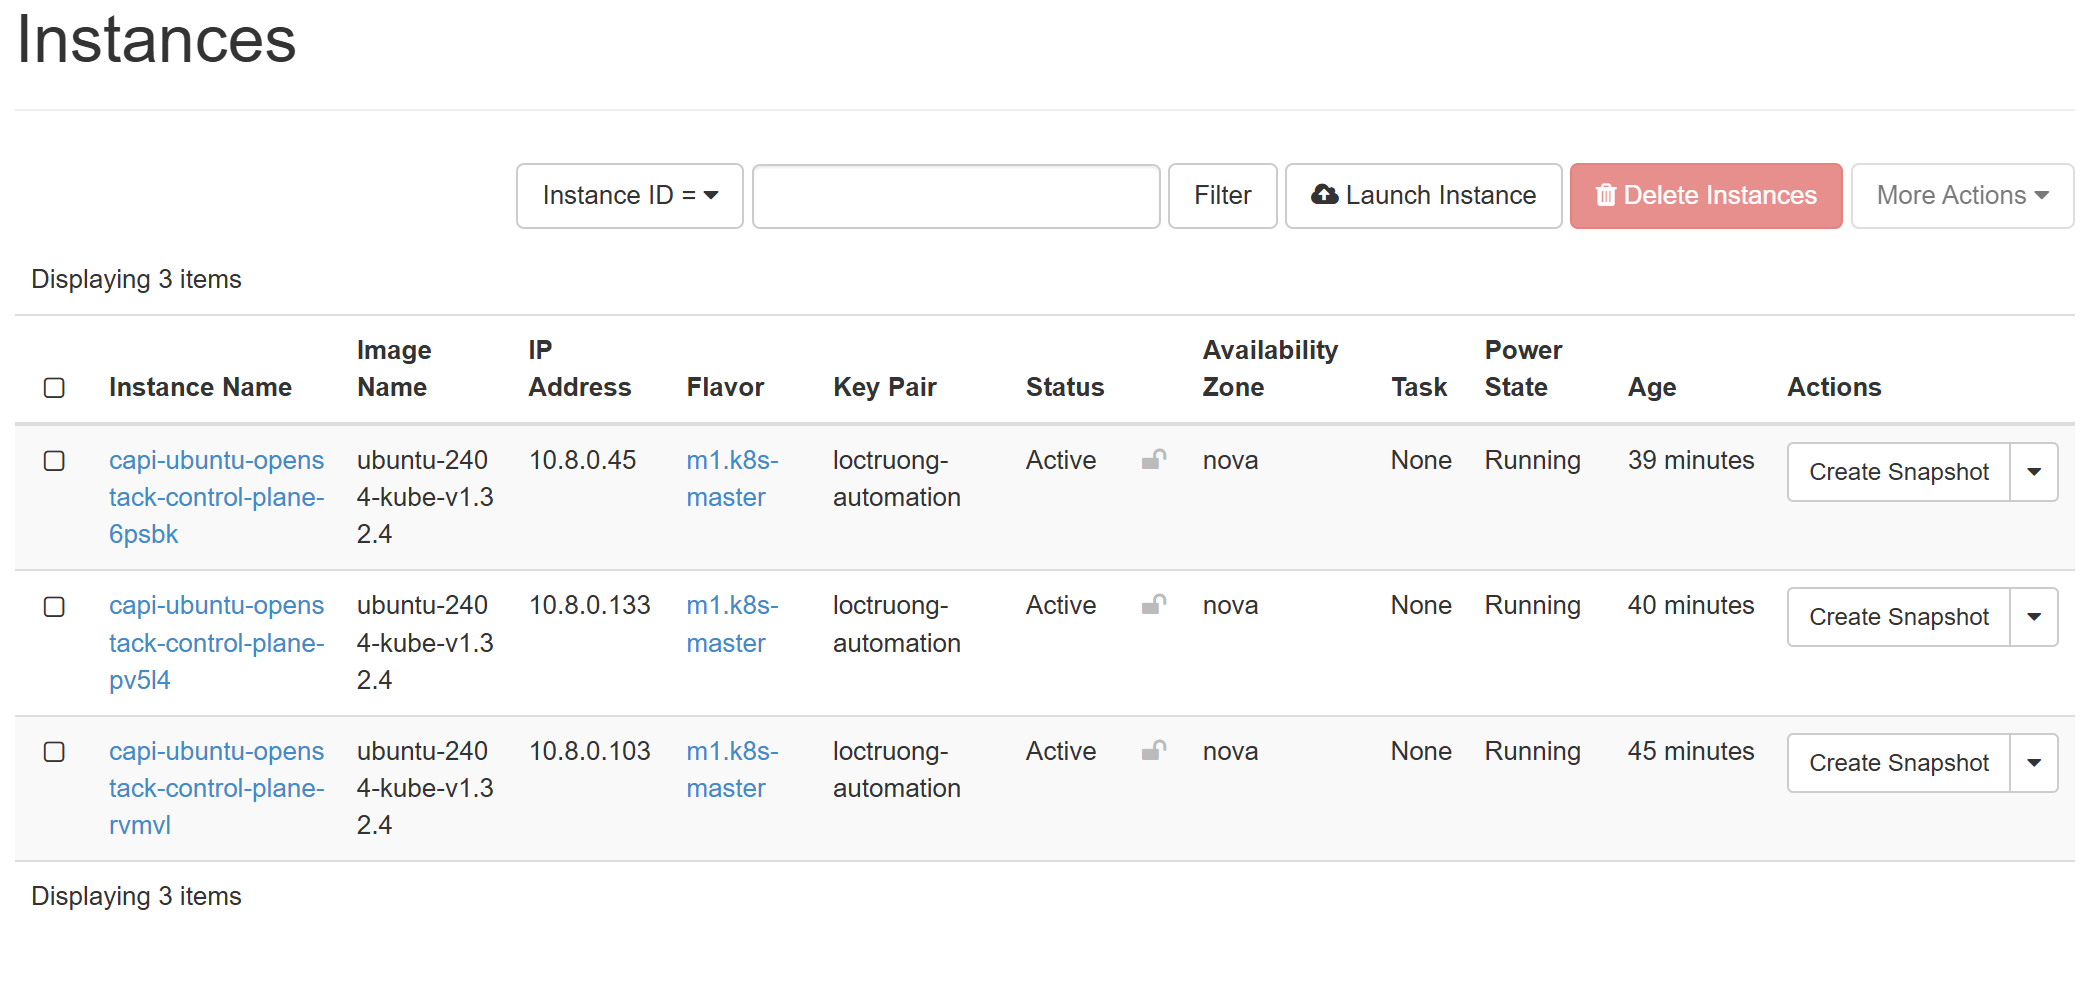
And we only have 3 control planes remained
kubectl get nodes
NAME                                              STATUS   ROLES           AGE   VERSION
capi-ubuntu-openstack-control-plane-6psbk         Ready    control-plane   85m   v1.32.4
capi-ubuntu-openstack-control-plane-pv5l4         Ready    control-plane   86m   v1.32.4
capi-ubuntu-openstack-control-plane-rvmvl         Ready    control-plane   92m   v1.32.4
The CAPI controllers helped us remove the node at infra side as well
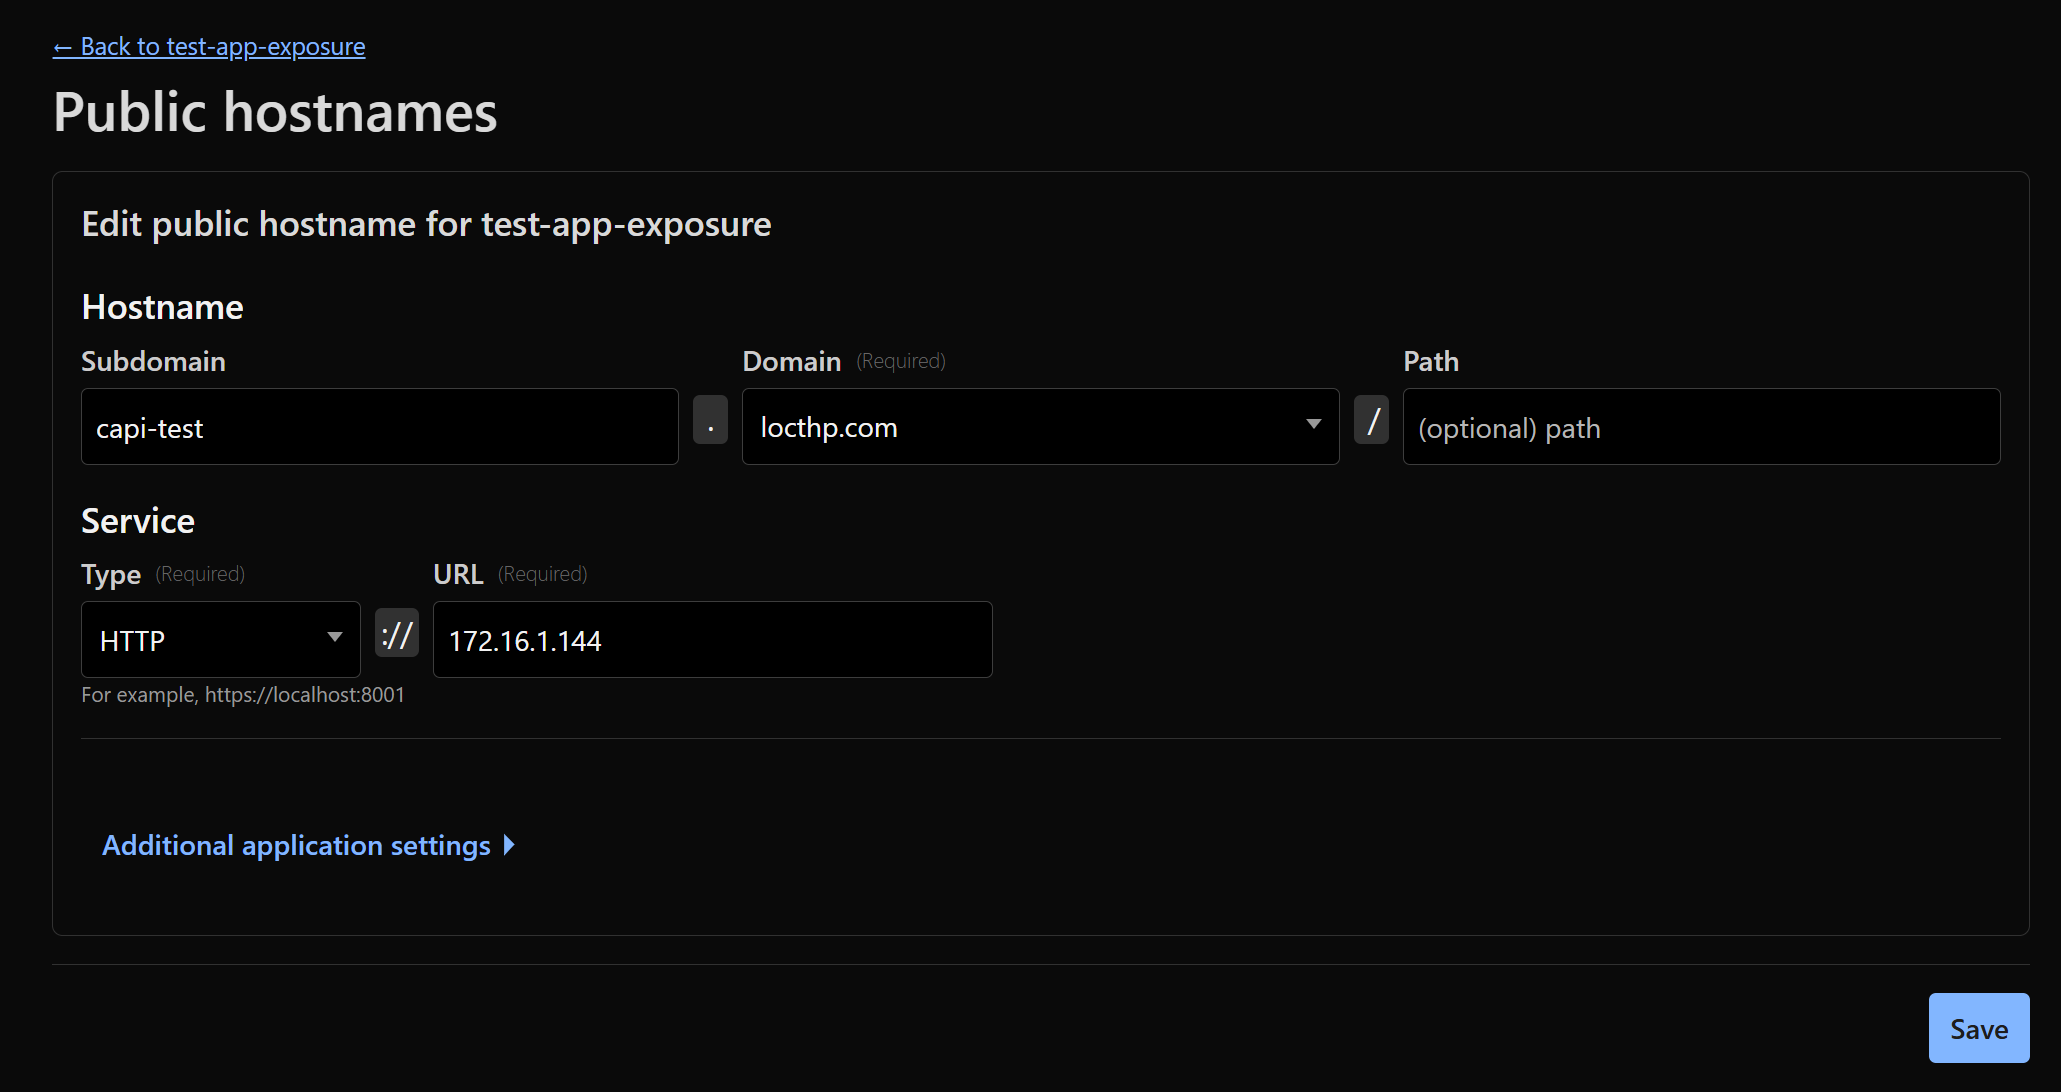
Bonus: 🌐 Exposing Services to the Internet
While our focus so far has been on cluster architecture and node pools, it’s worth noting that both “small” and “normal” nodes can serve real workloads accessible externally. For example, a simple web service or visualization app can be deployed on a normal node and exposed via an Ingress or LoadBalancer. I can then simply plug the public IP of the Ingress/LoadBalancer into the tunnel I mentioned in my previous blog
For example, if the public IP address of the LoadBalancer for the Ingress is:
kubectl get svc -n ingress-nginx
NAME                                 TYPE           CLUSTER-IP      EXTERNAL-IP    PORT(S)                      AGE
ingress-nginx-controller             LoadBalancer   10.110.55.92    172.16.1.144   80:31200/TCP,443:31010/TCP   56m
I just need to plug the IP 172.16.1.144 into the end of the tunnel and set the hostname. Cloudflare will handle SSL termination by default, so there’s no need to set up SSL manually.
nslookup capi-test.locthp.com
Server:         172.16.1.2
Address:        172.16.1.2#53

Non-authoritative answer:
Name:   capi-test.locthp.com
Address: 172.67.130.254
Name:   capi-test.locthp.com
Address: 104.21.9.184
Name:   capi-test.locthp.com
Address: 2606:4700:3031::ac43:82fe
Name:   capi-test.locthp.com
Address: 2606:4700:3037::6815:9b8

curl capi-test.locthp.com/small
{
  "hostname": "capi-ubuntu-openstack-small-worker-n7x6t-xzx7l",
  "main_ip": "10.8.0.193",
  "cpu_count": 2,
  "memory_gb": 3.82,
  "uptime_seconds": 562.91,
  "uptime_formatted": "9m 22s",
  "interfaces": {
    "lo": "127.0.0.1",
    "ens3": "10.8.0.193",
    "tunl0": "192.168.186.128"
  }
}

curl capi-test.locthp.com/normal
{
  "hostname": "capi-ubuntu-openstack-normal-worker-4k8vh-tfx2s",
  "main_ip": "10.8.0.41",
  "cpu_count": 4,
  "memory_gb": 7.76,
  "uptime_seconds": 550.49,
  "uptime_formatted": "9m 10s",
  "interfaces": {
    "lo": "127.0.0.1",
    "ens3": "10.8.0.41",
    "tunl0": "192.168.121.64"
  }
}
Wrapping Up & Looking Ahead
We now have a homelab Kubernetes cluster that behaves like a cloud-native cluster: it scales dynamically, integrates with cloud infrastructure, and is managed declaratively via CAPI. This lays a solid foundation for multi-tenant clusters, automated add-on deployment, and future expansion using the “grandmothership” model.
In Part 2, we’ll take this further by enabling multi-tenant hosted control planes - giving each user a fully isolated, with automatically scaling workloads, all managed seamlessly via Cluster API